Versions Compared

Key

  • This line was added.
  • This line was removed.
  • Formatting was changed.

Image Added


RoverX is a plugin for Enterprise Tester that provides users with the flexibility to conduct testing anywhere, including in remote locations or even in outer space.!

Panel

Features

  • Mobile and Offline Testing: Utilize a plugin that supports mobile and offline testing capabilities.
  • Offline Test Case Access: Download test cases while connected to execute them offline.
  • Offline Incident Access: Download associated incidents for offline review.
  • Test Execution Management: View Test Executions, Test Execution run history, and execute new Test Runs.
  • Incident Creation: Create new Incidents directly from the application.
  • Sync Dashboard: Upload your changes back to Enterprise Tester when you reconnect online.
  • Platform Support: Compatible with Windows machines and devices.
Panel
titleTable of Contents

Table of Contents

Panel

System Requirements

RoverX is a plugin for Enterprise Tester that enables offline access and management of Enterprise Tester data. To get started, ensure the following requirements are met:

  1. Enterprise Tester Instance: A working instance of Enterprise Tester accessible over the internet or through a network for uploading and downloading data.
  2. Rover License: A valid Rover license must be applied to Enterprise Tester.
  3. Windows Device: A Windows device with the .NET Framework 4.5 installed.

RoverX is a plugin for Enterprise Tester that enables offline access and management of Enterprise Tester data. To ensure compatibility and functionality, please meet the following requirements:

  1. Enterprise Tester Compatibility: RoverX is compatible with Enterprise Tester version 6.4 and above.

  2. Server Accessibility: Enterprise Tester must be installed on a server that is accessible either through the internet or your office network. This is necessary for:

    • Downloading Execution Sets, individual Test Runs, and associated Incidents before going offline.
    • Uploading your results and new incidents once you are back online.

Applying your Rover License

To apply your Rover License, you will need to have Administrator rights to Enterprise Tester.  

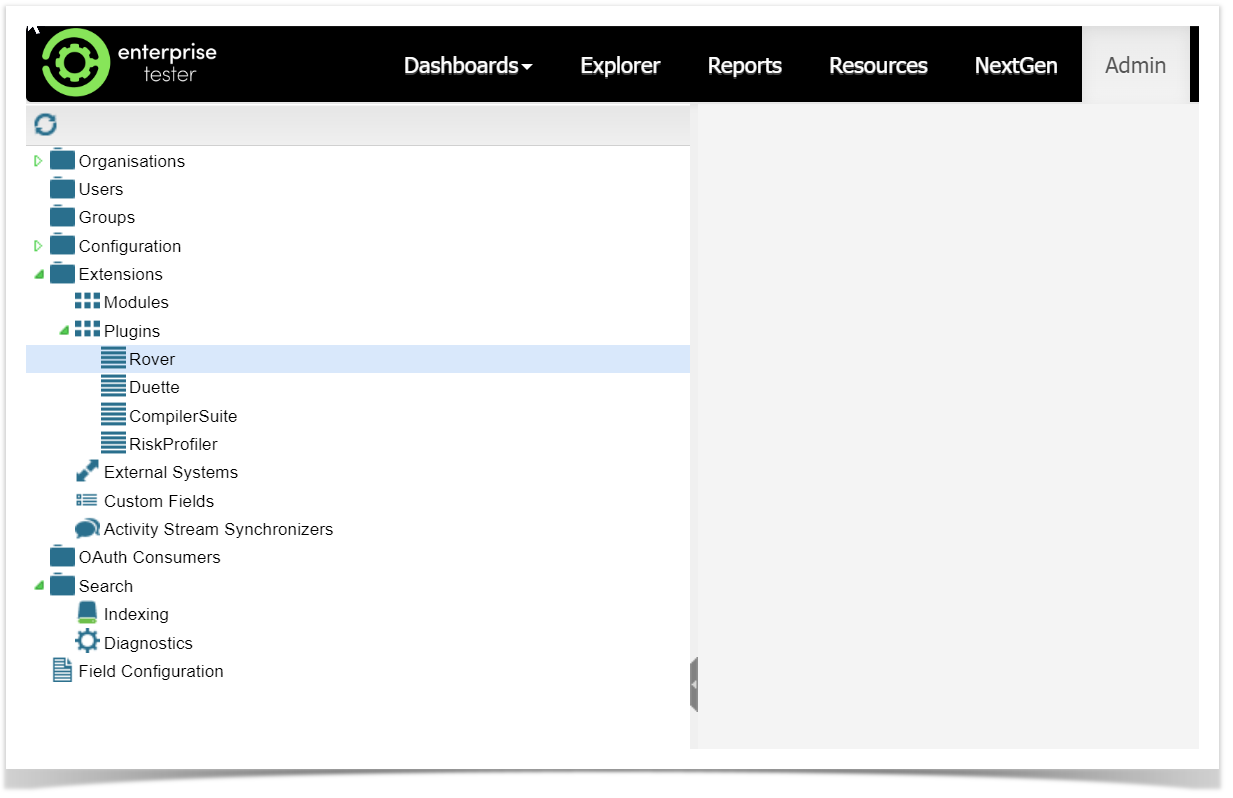
Navigate to the Admin tab, expand the Extensions folder and double click on Rover.

Image Added


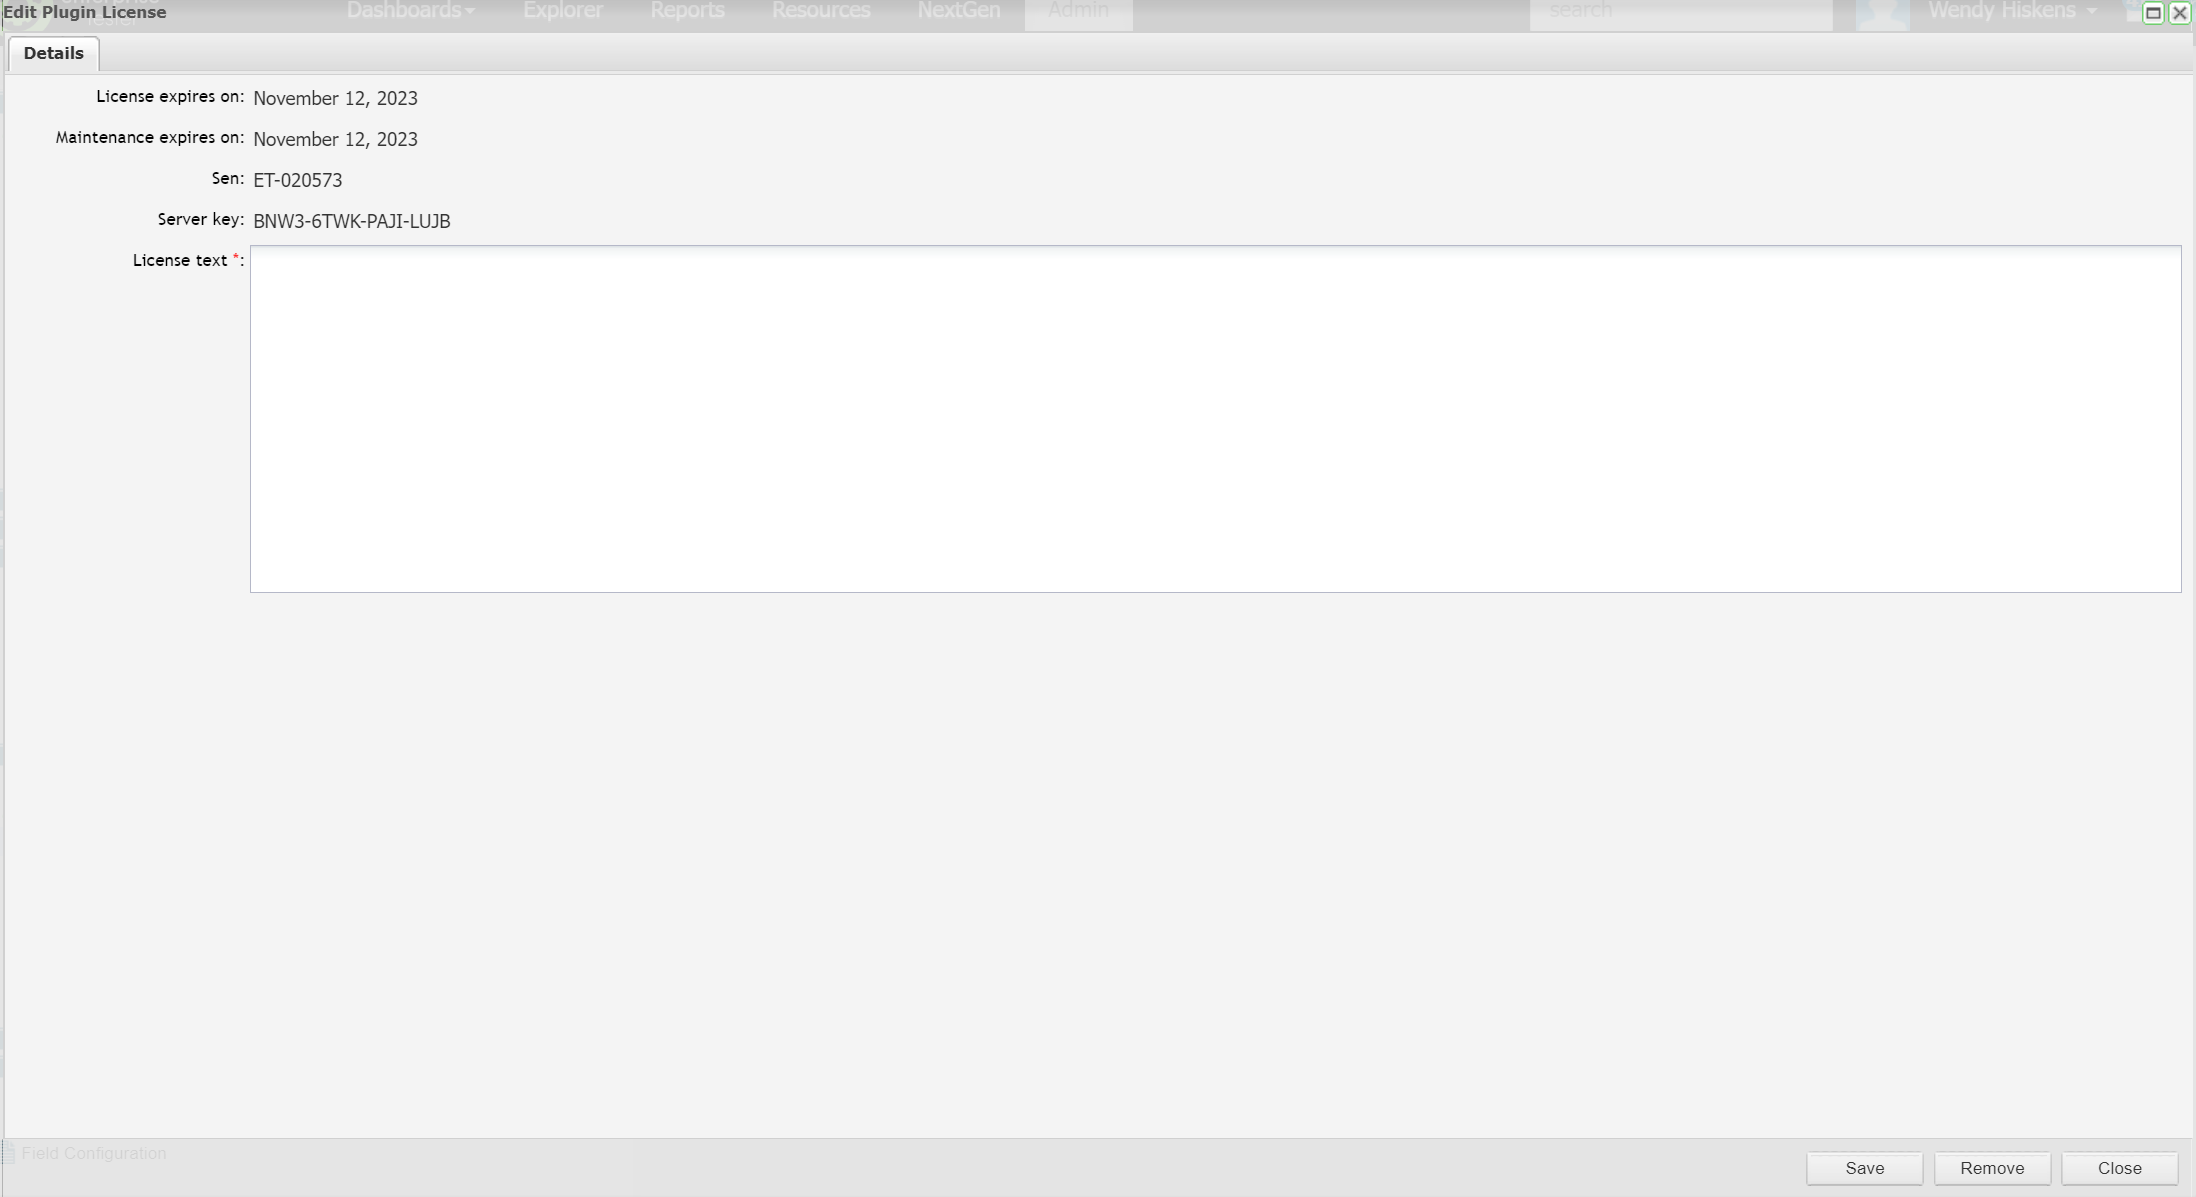
Add the license text ( if you do not have a license text, please contact Catch Sales) to the License Text field:

Image Added


Operating Systems (Client)

The client application supports the following Operating Systems:

  • Windows 10 and above
  • Windows Server 2019 and above

Note
titleMobile Phones not supported

Windows Phone and Windows Mobile do not support .NET 4.5

.NET Framework

Rover requires .NET 4.5 to be installed.

When installing the .Net Framework 4.5 you have two options - either install from a "web download" (a small download, which will then install only the components you require) or you can download a "redistributable" which is a large file containing all the files necessary for the .Net Framework 4.5 to be installed on any machine.

If you plan on installing the Framework on more than one machine within your organization it is suggested that you use the redistributable, to avoid multiple downloads.

The web downloader can be downloaded from:

http://www.microsoft.com/en-us/download/details.aspx?id=30653

It is approximately 1mb in size.

The redistributable can be downloaded from:

http://download.microsoft.com/download/2/7/3/273CB528-CAB3-4E8D-88D2-4477F0A1DAE4/enu_vs_common/netfx_ult/dotnetfx45_full_x86_x64.exe

It is approximately 50mb in size.


Panel

Getting Started

Enterprise Tester RoverX is an offline mobile client for Enterprise Tester that provides flexibility to run tests and log incidents without internet access. Here’s a detailed look at its capabilities:

Key Features and Functions:

  • Offline Testing: Run tests and log incidents offline, ideal for environments with limited or no internet access.
  • Downloading Test Runs: Select and download execution sets or individual test runs to your Windows machine or device (requires internet access).
  • Executing Test Runs: Perform the necessary test runs offline (internet access not required).
  • Incident Management: Create and assign incidents, and link failing test steps to incidents without needing an internet connection.
  • Uploading Data: Once connected to the internet, you can upload your test run results and new incidents back to the Enterprise Tester server.

Usage Workflow:

  1. Preparation:

    • Select and download the required test execution sets or individual test runs while connected to the internet.
  2. Offline Work:

    • Execute test runs offline.
    • Create and assign incidents during the testing process.
    • Link any failing test steps to incidents as needed.
  3. Syncing Data:

    • Upload the collected data back to the Enterprise Tester server once internet connectivity is restored.

RoverX ensures that testing processes can continue seamlessly even in remote or offline conditions, making it a versatile tool for testers working in diverse environments.


Installing Rover

RoverX is supported on Windows Operating Systems. For detailed system requirements, please refer to the System Requirements section.

Installation Steps

  1. Download the Application: Visit the Catch Software website to download the RoverX application zip file: https://catchsoftware.com/enterprise-tester-platform-edition/rover/.

  2. Unzip the Files: Extract the contents of the zip file to a location on your Windows machine or device.

  3. Run the Setup File: Locate and run the Setup file from the extracted folder. This will automatically install RoverX on your machine and launch the application.

Image Added

If you get the following pop up while installing RoverX select Install.
Image Added

Initial Setup and Login

  1. Launch RoverX: The Login screen will appear once the installation is complete. For easier access in the future, you can pin the application to your Start Menu or Taskbar.

  2. Connect to Enterprise Tester: The first time you log in, ensure that you are connected to the internet or your corporate network to access your Enterprise Tester server.

  3. Enter Login Details: On the Login screen, input your Enterprise Tester Server URL, username, and password. Then, click the Login button to access RoverX.

Image Added


If you do not have a Rover license applied to your installation of Enterprise Tester on the server, a message will appear alerting you that the license is missing or expired. If you see this message please contact your Enterprise Tester system administration to check your Rover license. 

The following message will be displayed . Select OK button. 

Image Added

RoverX will restart and by default will be in Offline mode.

Image Added

Select the Image Added icon to go to Online mode. When in Online mode the icon will be green.Image Added

Image Added
Note: Once you click the Login button when you are online this will download all active Enterprise Tester users. This will enable you to assign incidents to users.

If a different user wants to login to RoverX on you device the following message will be displayed.
Confirm the Restart: When prompted with the message "Select OK". RoverX will restart.

Image Added

Viewing your Projects

When you log in to RoverX for the first time Project field will be blank.

Image Added

  1. Open the Project List: Click on the down arrow located above the search field. This will display a list of available projects from Enterprise Tester.

  2. View Available Projects: Projects that appear in light grey are Categories within Enterprise Tester. The list of projects shown will depend on the projects your user account has access to in Enterprise Tester.

  3. Select a Project: From the Project drop-down list, choose a project.

Image Added

Viewing Execution Sets and Packages

  • Alphabetical Order: Once a project is selected, the Execution Sets and Packages will be displayed in alphabetical order.

  • Change Project: To view execution sets and packages from a different project, simply select a new project from the Project drop-down list.

Image Added


In Enterprise Tester, the Explorer Tree shows the following:

Image Added


The project category structure and the order of projects is retained.

The next time you log in to RoverX the last project selected will be displayed by default.

Navigating Rover

The Navigator on the left side of the RoverX interface provides five key options:

  1. Image Added Refresh: Update the current view to reflect any recent changes or updates from Enterprise Tester server.
  2. Image AddedTest Execution: Access and manage test executions, including starting new test runs and viewing existing ones.

  3. Image AddedSync Dashboard: Manage and view the sync status, including uploading changes to Enterprise Tester when online.
  4. Image AddedOnline/Image AddedOffline Mode: Toggle between online and offline modes to manage your test runs and data access as needed.

  5. Image AddedUser Settings: Access and modify your user settings for RoverX.

These options help you navigate and utilize the various features of RoverX efficiently.

Image Added

Online/Offline Modes

The Online/Offline option can be toggled to indicate your connection status with the Enterprise Tester server.

  • Offline Mode:

    • When you are not connected to the server, RoverX will display an indicator like the following image:
      Image Added

  • Online Mode:

    • When you are connected to the server, the indicator will change to show that you are online.
      Image Added

Toggling between these modes allows you to manage your connection status and perform tasks accordingly.


Search Bar

To find specific items within RoverX, follow these steps:

  1. Enter Search Criteria: Type your search terms into the Search field.

  2. Execute the Search: Press <Enter> on your keyboard or select the Search icon.

  3. View Search Results: The search results will be displayed in the tree view. Only items that match your search criteria, along with their parent folders, will be shown.
    Image Added

  4. Expand Folders: You may need to expand the folders in the tree view to see all relevant search results and their associated items.
    Image Added
  5. View Test Runs: Click on the packages to see the test runs returned in the search.

Image Added

User Settings

User settings are accessible by selecting the Settings Image Added button at the bottom left-hand side of the screen. You can manage various settings as follows:

  1. Edit Enterprise Tester URL:

    • Modify the URL for your Enterprise Tester server if needed.
  2. Change Password:

    • Update your password if it has changed on the Enterprise Tester server.
  3. Delete All Data from Local Database:

    • Remove all data stored locally in RoverX. This action clears the local database.
  4. Access Log Files:

    • Navigate to the directory containing the log files for RoverX for troubleshooting purposes.


Deleting All Data from Local Database

Warning: This will delete any local test runs or incidents that have not been uploaded to the Enterprise Tester server.

To Delete All Data from the Local Database:

  1. Initiate Deletion:

    • On the Login page, select the Delete All Data Image Addedbutton.
  2. Confirmation Message:

    • A confirmation message will be displayed:
      Image Added
    • Select Yes if you are sure you want to proceed.
  3. Completion Message:

    • Once the local database has been deleted, a message will be displayed:
      Image Added
  4. Restart RoverX:

    • Select the OK button. RoverX will restart automatically.
  5. Reconnect and Download:

    • Once RoverX has restarted, you will need to connect to the internet and go to Online mode to download Test Execution sets and associated incidents.

This process ensures that you start with a clean slate, but be mindful to upload any pending data to the Enterprise Tester server before proceeding.


Expanding and Collapsing the Right-Hand Panel

The right-hand panel can be expanded and collapsed on any of the screens by selecting the expand Image Added/collapse Image Addedbutton at the top of the right-hand panel. This allows you to manage the workspace effectively by showing or hiding additional information as needed.

Image Added


Invoke Error 

This error message appears when an action is attempted while another process is still running in the background.
Please wait for the current process to complete before trying again.
For example, this can happen when toggling quickly between Online and Offline mode.

Click "OK" to close the error dialogue. This error does not impact the functionality of the RoverX application.

Image Added

Additional Error Message:

You may encounter another similar error message.

Click "OK" to close it. Like the Invoke Error, it does not affect the operation of the RoverX application.


Image Added

Panel

Test Execution
Anchor
Execution Tests
Execution Tests


RoverX provides you with the ability to run tests from Enterprise Tester when you are on the go - working in remote locations, or in areas where internet connectivity is unreliable or unavailable.

RoverX supports synchronizing both test runs and incidents with Enterprise Tester. This article covers synchronizing and running test runs.

Although internet access is not required to run tests in RoverX, internet access is required when performing the following;

  • When downloading executions sets or individual test runs from Enterprise Tester server. Note: Any incidents that are associated to any of the test runs will be downloaded when the test run is downloaded.

  • When uploading test run results and new incidents to Enterprise Tester server.

The Getting Started article provides an introduction to help users become familiarized with RoverX.


Downloading Execution Sets to RoverX

An internet connection is required for this task. Make sure you are in Online mode in RoverX.

  1. Ensure Online Mode: Verify that you are connected to Enterprise Tester and in Online mode in RoverX.

  2. Select a Project: Choose the desired project from the Project drop-down list.

  3. View Execution Sets: The navigator will display the execution set folders and their test runs (excluding agile runs) in the selected project, as listed in the Enterprise Tester.

  4. Download Execution Sets: Select the execution sets you want to download. The selected execution sets will be downloaded to RoverX for offline access.

This process allows you to work with Execution Sets offline after downloading them from Enterprise Tester.

Selecting a Project

  • Open the Project Dropdown: Click on the Project dropdown list to view the available projects. Projects are organized into categories, similar to how they are structured in Enterprise Tester.

  • View Accessible Projects: Users will only see projects that are defined in their user permissions on the Enterprise Tester server.

  • Select a Project: Choose the desired project from the dropdown list. You can change the project at any time by selecting a different project from the dropdown.

  • Review Execution Sets: Once you have selected a project, you can review and select the execution sets or individual test runs you wish to download from the Enterprise Tester server.

Image Added

Selecting execution sets 

  • Expand Folders: By default, the folders are collapsed. The black button Image Added indicates that the folder can be expanded and contains sub-folders. Select this button to expand the folder.

    Image Added
  • Folder Expansion Indicator: Once the folder can no longer be expanded, the button will change to the following icon Image Added.

  • Expand All Packages: To expand all packages within a folder, right-click on the top execution set or any folder you wish to expand all sub-folders within.

Image Added

To view test runs in RoverX, follow these steps:

  1. Expand the Folder:

    • Navigate to the folder where the test runs are located and expand it.
  2. Select the Folder:

    • Click on the folder to display the Test Run table.
  3. View Test Run Count:

    • The number of test runs in the folder is displayed in brackets next to the folder name.
Image Added

Execution sets and individual test runs that you have not yet downloaded to your device, or that have been changed since your last download, will display a download icon Image Added. This helps you identify which items need to be downloaded or updated.

Download execution sets

  • Locate the Download Icon:

    • Find the download icon next to the folder or the individual script assignment you wish to download.
  • Download Specific Items:

    • Click on the download icon for the specific folder or individual script assignment to initiate the download.
  • Download All Items:

    • To download all execution sets and test runs, click on the download icon for the main Execution Sets folder.

While downloading, a progress bar will be displayed to show the download status.

Image Added

Once you have downloaded the execution set or the test runs the download icon will change to Image Added.
Image Added

To download one or more test runs, select the folder where the test runs are located.
Select the test runs you want to download.
Image Added
Select Download button. The selected test runs are downloaded.

Image Added

Test Run Details 

When viewing test run details in RoverX, they are displayed on the right-hand side of the screen. The following columns are included in the test run details:

Image Added

  • Downloaded  -  Indicates whether the test run has been downloaded to your local machine or is still stored on the Enterprise Tester server.
  • Assignment  The name or identifier of the test run.
  • Status Server - Displays the current status of the test run on the Enterprise Tester server.
  • Status Local -Shows the current status of the test run on your local machine.
  • Sync Status -  Tells you whether the test run has been recorded on the server or if it only exists locally. If the status is "local," the test run will be uploaded to Enterprise Tester
                            server during the next synchronisation.

Viewing and Running Tests

Once you have downloaded your test runs, you can click or tap on the test run in the table, depending on the device you are using, to view or execute your script.

Displayed Fields

When you view a test run, the following fields will be displayed on the screen. Note that if any fields are blank in Enterprise Tester, they will not appear in RoverX.

  • Script Description: A detailed description of the test script.
  • Script Objective: The goal or purpose of the test script.
  • Script Pre-Conditions: Any conditions that need to be met before executing the test script.
  • Script Post Conditions: Conditions expected after the test script has been executed.
  • Script Notes: Additional notes related to the test script.
  • Run History: The last two test executions will be shown for reference.

Image AddedRun History

You can choose to view any of the previous runs on the run history grid. The run history grid provides some basic details, including:

  • Run Number: The identifier for each test run.
  • Run By: Details of who executed the run.
  • Status: The status of each test run.
  • Sync Status: Indicates whether the run has been recorded on the server or if it only resides locally.
  • Incidents: Any incidents associated with the test run.


Starting a New Run or Completing an Existing Run

  • Starting a New Run
    You can start a new test run if the latest test run has been completed on the server or locally. To do this, simply select the Create New Run button located to the left of the run history grid.
  • Completing an Existing Run
    If the latest test run is incomplete (marked as "Not Run" or "In Progress"), you can continue with that test run and complete it instead of starting a new one.

Image Added

When you load the Test Execution screen, you will see the test steps displayed in a list view. This screen provides the following details:

  • Run Number: The identifier for the current test run.
  • Number of Steps: The total number of steps in the test run (displayed in brackets).
  • Test Run Name: The name of the current test run.
  • Test Run Status: The current status of the test run.
  • Back Button: Allows you to navigate back to the previous screen.
  • Step Result Menu: Located at the bottom of the screen, for selecting the results of each test step.
  • Custom Field Icon: Appears if there are any custom fields associated with the test run.

Image Added
Viewing and updating Custom fields

If your test run includes custom fields, you will see this button Image Added in the header. Clicking on this icon will close the Test Steps panel and display all the custom fields, allowing you to view and update them accordingly.

Image Added

You can then update any of the custom fields and select the Save button. A confirmation message will be displayed to confirm that the data has been saved successfully.
Select OK button.
Image Added

To close the Custom Fields panel and return to the Test Steps, select the Image Added button.

Just like in Enterprise Tester, the Test Execution screen includes a text field for entering Actual Results for each test step.

While a step is active, you can select the Step Result option at the bottom of the screen to set the status for that specific step. Once you select a status for a test step, the screen will automatically move to the next step in the list.

Hyperlinks and local paths can be added in the Actual Result field.

Keyboard Shortcuts for Test Execution

To enhance efficiency while working with test steps, you can use the following keyboard shortcuts:

  • Ctrl+P: Mark the current step as Passed.
  • Ctrl+F: Mark the current step as Failed.
  • Ctrl+B: Mark the current step as Blocked.
  • Ctrl+U: Mark the current step as Undetermined.

These shortcuts allow you to quickly update the status of the current test step.

Using Shortcut Keys to Set Step Status

You can streamline your testing process by using shortcut keys to set statuses for multiple steps at once.

For example, if you want to mark all steps in the test run as Passed:

  1. Press <CTRL+A> to select all steps.
  2. Then press <CTRL+P> to mark all selected test steps as Passed.

This functionality allows you to quickly update the status of multiple steps without having to select each one individually.

Copying and Pasting Text

RoverX allows you to copy and paste text from external sources, such as Excel, directly into the Actual Result field. To do this:

  1. Copy the desired text from your source (e.g., Excel) using Ctrl+C.
  2. Navigate to the Expected Result field in Rover.
  3. Paste the copied text into the field by using Ctrl+V.

This feature helps streamline the process of entering expected results by enabling quick transfers of text data.

You can also copy the Expected Result to the Actual Result field. 

Image Added  

To do this open the Actual Result field and then select CTRL+V and it will paste it.
Image Added
   

Then click on the X button to close the Actual Result pop up  window. Note: Clicking the X button saves the changes to Actual Result field.

Image Added


Test Step and Test Run Statuses

In RoverX, test step and test run statuses are consistent with those in Enterprise Tester.

Status Representation

  • Icons and Color Coding: Statuses are represented by icons and the color of the test step row. Hover over an icon to view the detailed status.
  • Test Run Statuses: In addition to the statuses used for individual test steps, test runs have an additional status: In Progress.

Overall Test Run Status

The overall status of a test run is automatically determined based on the statuses of its individual test steps.

Image Added Passed

Image Added Failed

Image Added Blocked

Image Added Undetermined

Image AddedIn Progress

Image Added

Adding Attachments to Test Steps

You can attach one or more files to a test step by following these steps:

  1. Select the Attachment Button Image Added: Click the button located in the Attachment column of the test step.
  2. Manage Attachments Popup: This action will open the Manage Attachments popup, where you can upload and manage your attachments.
  3. Select Files: Click the Image Addedbutton within the popup to find and select your files. You can select multiple files at once.
  4. Upload and Display: The selected files will be uploaded, and their paths will be displayed in the popup.

This feature allows you to include relevant files and documents with each test step for better documentation and reference.

Image Added

Managing Attachments

If you scroll to the right within the Manage Attachments popup, you have the following options for each attachment:

  • View: Click to open and view the attached file.
  • Delete: Click to remove the attachment from the test step.

These options allow you to easily manage the files associated with your test steps.


Image Added
Select the X button to return to the Test Run.
Once you return to the Test Run screen, an icon will appear to indicate that there are attachments for the test step.
Hover over the Image Addedicon to see the number of attachments associated with the test step.

Image Added

Clicking on the Image Added will open the Manage Attachments popup where you can view or delete existing attachments.

Panel

Incidents
Anchor
Incidents
Incidents

RoverX is a tool that enhances the testing capabilities of Enterprise Tester, particularly useful for remote or offline environments. Here’s a summary of its key features and requirements:

Key Features:

  • Offline Testing: Allows running tests without the need for internet connectivity, ideal for remote locations.
  • Synchronization: Supports synchronizing both script assignments and incidents with Enterprise Tester.
  • Creating Incidents: Incidents can be created during the testing process.

Internet Connectivity Requirements:

  • Downloading Data: Internet access is required for downloading test executions, test runs, and associated incidents from the Enterprise Tester server.
  • Uploading Data: Internet access is also necessary for uploading test run results and new incidents to the Enterprise Tester server.

Limitations:

RoverX does not currently support the following Enterprise Tester features:

  • Agile Runs: RoverX does not support agile runs, which are specific to agile methodologies and workflows.

  • Run Timer: The run timer feature, used to track the duration of test runs, is not available in RoverX.

These limitations mean that certain features available in Enterprise Tester will not be accessible while using RoverX.

The Getting Started article provides an introduction to help users become familiarized with RoverX.

Managing Incidents

In RoverX, you have the option to manage incidents by either creating new ones or linking them to existing downloaded incidents.

  1. Create New Incidents: You can create new incidents directly within RoverX if needed. This allows you to document and manage issues encountered during test runs.

  2. Link to Existing Incidents: Alternatively, you can link to an existing downloaded incident. This is useful for maintaining continuity and associating new issues with previously documented incidents.

Create Incident

To log an incident on a failed test step, follow these steps:

  1. Select the Incident Button: Click the Image Addedbutton in the Incident column for the test step that has failed.

  2. Access the Create Incident Screen: The Create Incident screen will be displayed.

  3. Default Summary: By default, the Test Script Name will automatically be populated in the Summary field. You can choose to keep this default summary or edit it as needed.

  4. Fill Out Required Fields: All fields that are present in Enterprise Tester will be visible on the Create Incident screen. If a field is mandatory in Enterprise Tester, it will also be required in RoverX.Image Added

  5. Save the Incident: Once you have completed entering the details, click the Save button. The Create Incident screen will close, and you will be returned to your test run.

  6. Incident Icon: A bug icon will now be added to the test step, indicating that an incident has been created for this step.Image Added

When creating an incident, you have the option to link it to an external Jira system, provided that integration has been configured in Enterprise Tester for your project.

  1. Select External Jira System Link: If your project has been configured with external Jira system links in Enterprise Tester, you can select the appropriate link from the Synchronize To: dropdown list.

  2. Automatic Selection: By default, the first external Jira system link configured in Enterprise Tester will be selected. If there are multiple Jira system links, choose the one that is appropriate for your needs.

  3. Sync with Jira: Once selected, the incident will be synchronized with your external Jira system when the incident is uploaded to Enterprise Tester.

  4. No Jira Integration: If Jira integration is not set up with Enterprise Tester, there will be no options available for the Synchronize To: field.

This allows you to ensure that incidents are properly linked and synchronized with your external Jira system if configured.

Image Added


The following are drop down lists and can be changed. The values in the fields are from the Project in Enterprise Tester.

Priority:

Image Added

Status:

Image Added


Type:

Image Added


Resolution:
By default the Resolution field is blank. But you may if change this if you need to.

Image Added


Assigned To: 
Only Active users in Enterprise Tester are displayed. If the Assigned To field is mandatory it will default to the user that is logged in.

Image Added

Note: If there is nothing in the Assign To: field , this usually means you have not synced the users from Enterprise Tester to Rover.
To do this, make sure you are connected to the Internet, select Online mode and click on the Login button. This will download all active users from Enterprise Tester.

Description field
The Description field will  be populated with the same data that is created in Enterprise Tester when you create an incident from a test step.

In Enterprise Tester:

Image Added

In Rover:

Image Added

Editing an Incident:

You can edit an incident while it is still local (i.e., has not been synchronized to Enterprise Tester).

  1. Open the Incidents Pop-up: Click the Image Addedbutton to display the Incidents pop-up. This pop-up shows all incidents linked to the selected test step.

  2. View Incidents: The Incidents pop-up will display all incidents associated with the selected test step.Image Added

  3. Edit an Existing Incident: To modify an existing incident, select the incident from the list and make the necessary changes.

  4. Create a New Incident: If needed, you can also create a new incident from the Incidents pop-up.

  5. Save Changes: After editing or creating incidents, ensure to save your changes to update the local data.


Linking Incidents to a Test Step

You can view all linked incidents, link additional incidents, or create a new incident. Here’s how to manage incident links:

  1. Select the Incident Button: Click the Image Addedbutton in the Incident column for the test step that has failed.

  2. Access the Create Incident Screen: The Create Incident screen will be displayed.

  3. Open Link/Unlink Incidents Screen: Click on the Link/Unlink Incidents link at the top left of the Create Incident screen.
    Image Added
  4. View Link/Unlink Incidents Screen: The Link/Unlink Incidents screen will be displayed with the following elements:

    • Step Description: Shows details about the current test step.
    • Search Bar: Allows you to search for incidents.
    • Back Button: Navigate back to the previous screen.
    • Linked Incidents: Lists all incidents already associated with the test step.
    • All Incidents: Displays all local incidents that can be linked.
    • Link Button: Link incidents to the step by selecting this button.
    • Unlink Button: Remove incidents from the step by selecting this button.
      Image Added
  5. Filter Incidents: To filter existing incidents, start typing in the Summary field. The list of incidents will automatically update to show only those that match the text you have entered.
    Image Added

  6. Link Incidents: To add incidents to the test step, select the Link button next to the desired incident in the All Incidents section.

  7. Unlink Incidents: To remove incidents from the test step, select the Unlink button next to the incident in the Linked Incidents section.

Returning to the Test Execution Screen

To return to the Test Execution screen after managing incidents:

  1. Navigate Back: Click the Back button to return to the Create Incident screen.

  2. Return to Test Execution: Click the Back button again to navigate back to the Test Execution screen.

This process ensures that you exit the incident management screens and return to your test run view.


Synchronizing Runs and Incidents

Once you have completed your testing, you can synchronize your runs and incidents back to Enterprise Tester. For detailed instructions on how to perform synchronization, please refer to the Synchronization article.


Image Removed

We are very excited to introduce Enterprise Tester Rover, our new mobile plugin for ET which gives users the flexibility to test anywhere. With Rover, users will now be able to access ET’s core features whether you’re working offsite or all the way in outer space!

Section
Column

Features

  • Plugin for mobile and offline testing
  • Download test cases while connected, for offline execution
  • Download incidents while connected, for offline access
  • View script assignments and script assignment run history, execute a new run
  • Supported on Windows machines and devices
Column

Topics


Panel

Synchronization
Anchor
Synchronisation
Synchronisation

RoverX provides a convenient way to copy your Execution Sets and Incidents to your client machine or device, enabling offline testing. When you are reconnected, you can upload your test runs and incidents back to Enterprise Tester.

To synchronize your Execution Sets and Incidents:

  1. Ensure Connectivity: You will need an internet connection or access to Enterprise Tester, which may require being connected to your office network. This connectivity is necessary for both the download and upload processes.

  2. Download Execution Sets and Incidents: When connected, download the necessary Execution Sets and Incidents to your local machine for offline use.

  3. Upload Changes: Once you have completed your testing, you can synchronize (upload) your Execution Sets and Incidents back to Enterprise Tester.

Uploading Entities to Enterprise Tester

Once you have completed your testing, you can upload your runs and incidents back to Enterprise Tester by navigating to the Sync Dashboard.

To Upload Your Runs and Incidents:

  1. Access the Sync Dashboard:

    • Navigate to the Sync tab. Note that the Sync Dashboard can only be accessed when you are in Online mode and connected to the Enterprise Tester server.
  2. Start Synchronization:

    • Clicking on the Sync Dashboard will automatically initiate the synchronization process, uploading your runs and incidents to Enterprise Tester.

Sync Dashboard at a Glance

The Sync Dashboard provides a comprehensive view of the synchronization status, allowing you to monitor upload progress and ensure successful data transfer.

Image Added

  • Progress Bar: Displays the sync progress.
  • Runs to be Synced: Number of test runs to be synced, grouped by status.
  • Runs Synced: Number of successfully synced test runs (highlighted in green).
  • Runs Failed to Sync: Number of test runs that failed to sync (highlighted in red).
  • Incidents to be Synced: Number of incidents per test run status to be synced.
  • Incidents Synced: Number of successfully synced incidents (highlighted in green).
  • Incidents Failed to Sync: Number of incidents that failed to sync (highlighted in red).
  • Attachments to be Synced: Number of attachments to be synced, grouped by test run status.
  • Attachments Synced: Number of successfully synced attachments (highlighted in green).
  • Attachments Failed to Sync: Number of attachments that failed to sync (highlighted in red).
  • Incidents to be Linked: Number of incident links to be synced.
  • Incidents Linked: Number of successfully synced incident links (highlighted in green).
  • Incidents Failed to Link: Number of incident links that failed to sync (highlighted in red).


Synchronization Process for Completed Test Runs
Anchor
Synchronization Process for Completed Test Runs

To ensure smooth and accurate synchronization to Enterprise Tester,  the synchronization process is as follows:

1.Upload Completed Test Runs:

  • Completed test runs are uploaded first.
  • Test runs marked "In Progress" or "Not Run" will be uploaded later when selected by the user.

Image Added


2. Upload Incidents Associated with Test Runs:

  • After test runs are uploaded, associated incidents are uploaded.
  • The dashboard displays both incidents to be synced and incidents that have been synced.

Image Added


3. Upload Attachments:

  • Attachments related to test steps and incidents are uploaded next.
    Image Added


4. Link Incidents to Test Runs:

  • Finally, incidents are linked to their corresponding test runs to complete the synchronization process.


Process for Incomplete Runs

After all completed test runs, attachments, and incidents are uploaded:

  1. Notification and Review:

    • A button will blink on the screen.
    • A table will display test runs that are "In Progress" or "Not Run."
      Image Added
  2. Decision:

    • Review the incomplete test runs.
    • Decide whether to upload them or return to Test Execution Image Added to complete them.
  3. Upload Incomplete Test Runs:

    • If you choose to upload, they will sync to Enterprise Tester with the same status.
    • To upload, simply select the Image Addedbutton. The sync process will follow the same order as the Synchronization Process for Completed Test Runs. Once the upload is completed, the table will disappear.

      Image Added

Notes on Synchronization

Synchronization requires matching the Enterprise Tester ID for each entity to ensure successful sync between RoverX and the Enterprise Tester server. Changes made to the Enterprise Tester server between downloading to RoverX and uploading results back to Enterprise Tester may cause synchronization issues. Here are common causes of synchronization failure:

Causes of Synchronization Failure:

  1. Deletions on the Enterprise Tester Server:

    • Deleted script assignments prevent runs or updates from syncing back to Enterprise Tester, even if the script assignment is recreated.
    • RoverX uses Enterprise Tester IDs for mapping. Deletions remove these IDs, making synchronization impossible.
  2. Baseline Restores in Enterprise Tester:

    • Avoid baseline restores if using RoverX.
    • Restores revert the project to a previous state, altering IDs and replacing them with new ones.
    • Entities will not sync if a baseline restore occurs between downloading and uploading.
  3. Custom Field Configuration:

    • Changes to custom fields, such as making fields mandatory or adding new mandatory fields, can cause synchronization failure.
    • If you have made these changes in Enterprise Tester you need to select the Refresh Image Added button to download the changes to RoverX.


Additional Notes:

  • If you lose internet or VPN connection during synchronization, it will resume from where it left off once you are back online.
  • Failed uploads will be displayed in a table similar to the Incomplete Test Runs.
  • Test runs with a status of "Not Run" will only sync back to Enterprise Tester if they have an associated incident or attachment.


Troubleshooting Synchronization

If you are having trouble diagnosing the cause of your synchronization failure, please send a copy of your Rover log file for the day the sync failed to the Catch Support Team.
The Log files can be found by clicking on the folder icon on the Login screen.
Please also note the time of the failure.

Image Added