Enterprise Tester is fully integrated with JIRA to support the synchronization of both requirements and issues. Enterprise Tester supports bi-directional synchronization of issues. Key Features include:
- In-built field synchronization of: Summary,Type, Status, Priorities, Components, Affects Version(s), Fix Version(s), Assignee, and Comments;
- Configurable synchronization schedule;
- Configurable synchronization direction options: single (ET to JIRA or JIRA to ET) and bi-directional (ET synchronizes first or JIRA synchronizes first)
- Filter options supported for JIRA to ET synchronization, including JQL fragments;
- Custom field support;
- Support for synchronizing picklist (select list) values from JIRA to ET, including JQL fragments;
- JIRA ID on the incident in ET;
- Remote links to the incident in ET and test run added on the JIRA Issue; and
- Full JIRA workflow transition support from ET.
Creating your Project Links to JIRA
Once the JIRA connection has been created (see Configuring Enterprise Tester for JIRA 5.2 and Above), you can begin associating projects in JIRA with projects in Enterprise Tester. Project links can be created and managed either from the Resources tab on your tree view navigator or on the External System Links tab.
External System Links Tab
From the Admin tab, expand Extensions and double click on External Systems. From the External Systems summary grid, double click the External System you wish to create a link to. Then navigate to the Links tab. Click on Add from the tool bar.
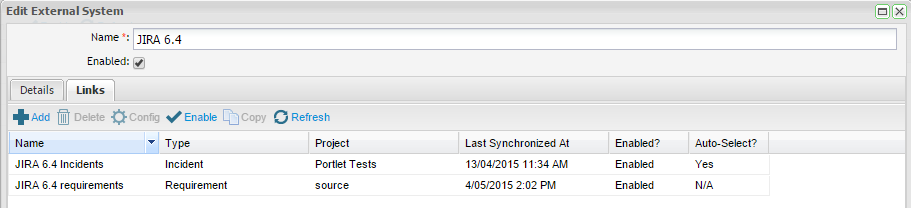
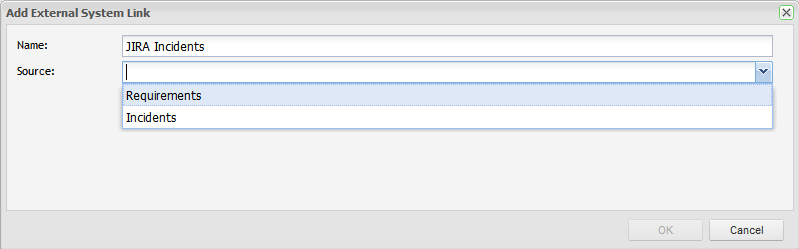
The Add External System Link screen will appear. Complete the name and select the Link Source. This is the entity type you wish to synchronize.
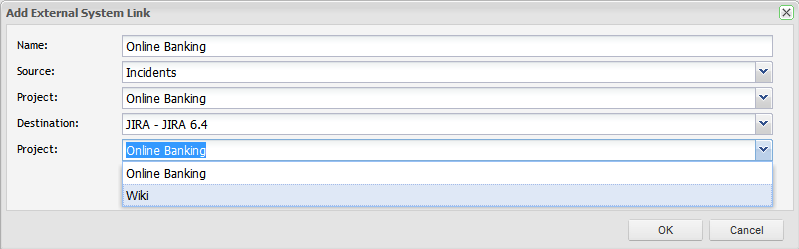
Once you have selected the Source, additional fields to configure the ET project and the JIRA project will appear.
Once you have completed the screen, click on OK. The External Links Details screen will appear. See the Field Configuration section below.
Resources Tab
From the Resources Tab, click to expand "Project Links". To view all configured links for your project, double click on your project.

To create a new project link select "New" from the toolbar, or from the navigator you can right click on your project and select "Add New Project Link" from the menu, or from the navigator you can right click on your project. Complete the details selecting the JIRA connection that you created in the steps outlined in the above section, and your JIRA project to link to. Now click on 'Save'.
Once the project link to JIRA has been created, Enterprise Tester will initiate a refresh of all the metadata. This may take a few minutes.
Project Link Configuration
Once you have created the incident project link, the Edit Synchronization Configuration screen will appear.
ET Configuration
There are no options in this section for incident synchronization links because Enterprise Tester will synchronize all incidents created in ET for this project with the JIRA project configured. If you have more than one JIRA project configured to synchronize with this project, you can select which project you wish to synchronize with on the incident screen. You can also choose to synchronize ET incidents with more than one JIRA project provided that you have set up multiple project links.
External System Configuration
If you are synchronizing incidents created in JIRA to Enterprise Tester, you can specify criteria to filter the incidents that will be selected for synchronization.
Filtering options include:
- Type
- Statuses
- Priorities
- JQL
- Components
- Affected Versions
- Fixed Versions
- Allow Unassigned issues (see Allow Unassigned issues to be synchronized with JIRA)
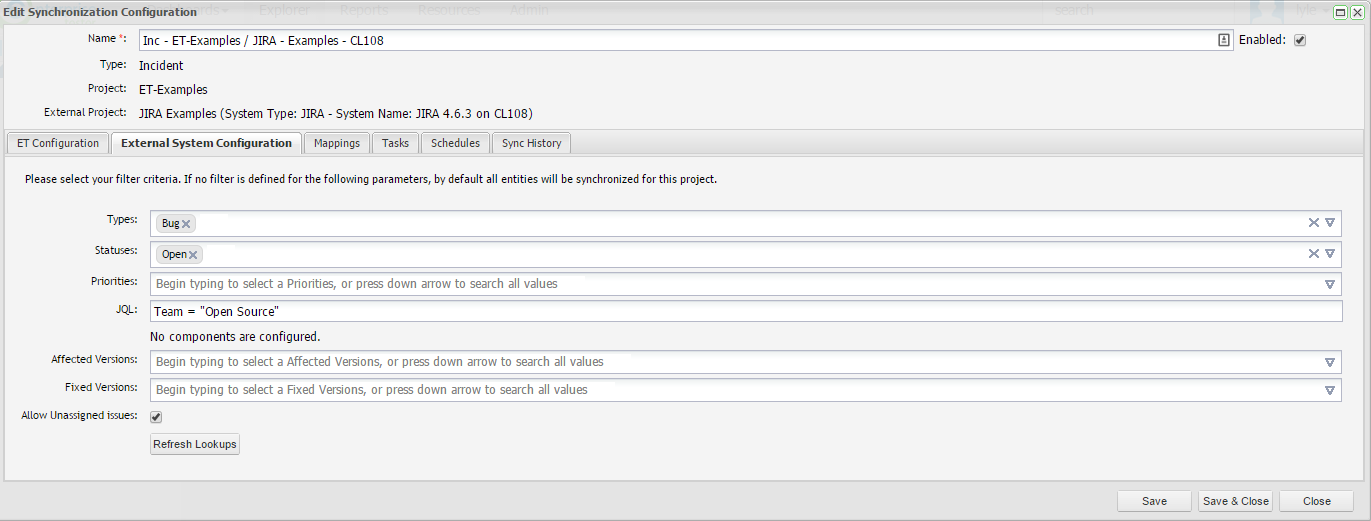
If no filter criteria is selected all issues logged in the JIRA project will be in scope for synchronization.
JQL Fragments
When using JQL fragments as part of your query criteria, the additional filter criteria you have selected will be added. ET already specifies the JIRA project in the filter parameters based on the project you are syncing your ET project with.
If you find that you the issues being synchronized are not what you expected, it is worth testing your JQL fragment in JIRA.
Refresh Lookups
When a project link is created a refresh lookups kicks off. This process finds all the JIRA field values for your project to populate the picklist (select list) for this screen. If you do not see any JIRA values in the drop down list or an incomplete list is presented, click on Refresh Lookups to update the picklist values.
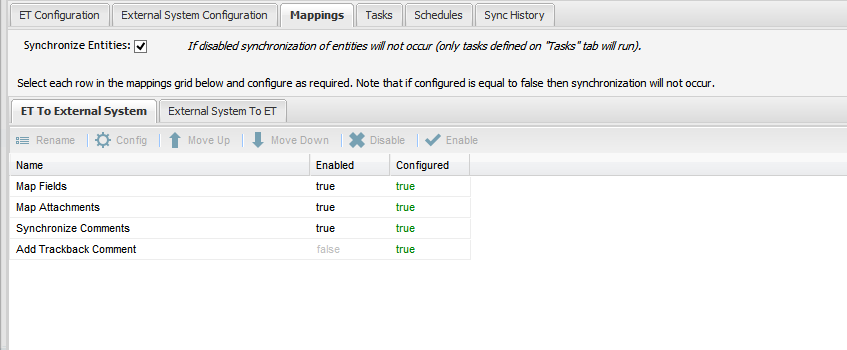
Field Configuration — Mappings
On the mappings tab, the Synchronize Entities option is pre-selected. The selection of this option will ensure that incident and tasks are synchronized. If the Synchronize Entities is not selected, then only the Tasks will run. See the Task section for more detail.
This screen displays two tabs for outlining and configuring the steps undertaken when synchronization is initiated.
• One tab for mapping fields from Enterprise Tester to the external system (JIRA).
• One tab for mapping fields from the external system (JIRA) to Enterprise Tester
Enterprise Tester to JIRA Mappings
The next step is to configure Enterprise Tester inbuilt fields to JIRA fields. On the ET to External System Tab, there are four activities that are set to run on Synchronization of an incident:
Task | Configurable | Description |
|---|---|---|
Map Fields | Yes | Allows a set of mappings to be configured to transfer information between the source and destination system. |
Map Attachments | No | Synchronizes the set of attachments between Enterprise Tester and External System (e.g. JIRA). This will add new attachments that have not been synchronized previously, and remove previously synchronized attachments that have since been removed. |
Synchronize Comments | Yes | Synchronizes all comments added in either ET or JIRA to the other system. |
Add Trackback Comment | Yes | Adds a comment to the synchronized JIRA incident with the following text: Linked to Enterprise Tester incident — e.g. incident: http://server/EnterpriseTester/#/incident/edit/04e7f9e5-5784-4e94-a863-9ef600f0a935 (Name: ). If a comment already exists with the same value, then the comment is not added. |
The Map Fields activity is the only configuration you will need to complete on this screen. Note that it is the only activity that displays false in the Configured column. To configure the field mappings, click to select Map Field and click Config from the toolbar.
The Configure Field Mappings screen will appear and all ET inbuilt fields have pre-set mapping to JIRA inbuilt fields.
Some fields will require mapping or confirmation of the pre-configured mappings. These will be marked as false in the Configured column.
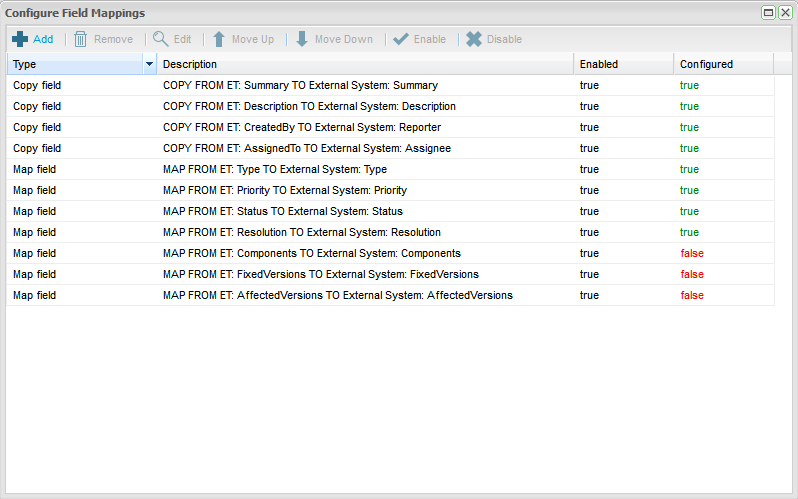
Several configurations are automatically created consisting of Copy Field type mappings and direct Map field type mappings.
The Copy Field type mappings are already configured and the value will be copied from Enterprise Tester to JIRA on Synchronization:
Copy Field – Copy from ET: Name (field) to External System: Summary (field)
Copy Field – Copy from ET: Description to External System: Description (field)
Copy Field – Copy from ET: Created By (field) to External System: Reporter (field)
Copy Field – Copy from ET: Assigned To (field) to External System: Assignee (field)
The Map field type mappings require the field values to be mapped. You can see under the column “Configured = False” that the values for these fields has not yet been mapped:
Map Field – Map from ET: Type to External System: Type
Map Field – Map from ET: Priority to External System: Priority
Map Field – Map from ET: Status to External System: Status
Map Field – Map from ET: Resolution to External System: Resolution\
Map Field – Map from ET: Components to External System: Components
Map Field – Map from ET: Fixed Versions to External System: Fixed Versions
Map Field – Map from ET: Affected Versions to External System: Affected Versions
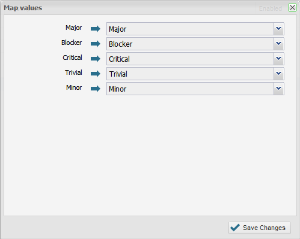
Before you Start
We recommend that you align your JIRA and Enterprise Tester picklist values in advance of this configuration to reduce the manual mapping required.
To complete the field mappings, click on the field row and select Edit from the tool bar.
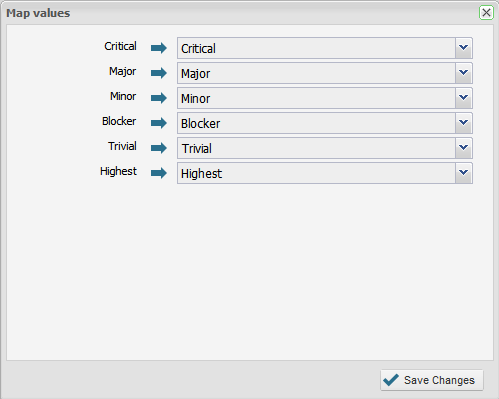
Complete mapping Enterprise Tester field values to JIRA field values. Where picklist values in ET and JIRA are exact matches, the mappings will be automatically configured.
Click Save Changes.
Complete mapping field values for all fields following steps 1-3.
JIRA to Enterprise Tester Mappings
The next step is to configure JIRA to Enterprise Tester field mappings. On the External System to ET tab, there are also four activities that are set to run on Synchronization of an incident:
Task | Configurable | Description |
|---|---|---|
Map Fields | Yes | Allows a set of mappings to be configured to transfer information between the JIRA and ET. |
Map Attachments | No | Synchronizes the set of attachments between from JIRA to ET. This will add new attachments that have not been synchronized previously, and remove previously synchronized attachments that have since been removed. |
Synchronize Comments | Yes | Synchronizes all comments added in JIRA to ET. |
Add Trackback Comment | Yes | Adds a comment to the synchronized JIRA incident with a trackback link to the ET incident: Linked to Enterprise Tester incident — e.g. Incident: http://server/EnterpriseTester/#/incident/edit/04e7f9e5-5784-4e94-a863-9ef600f0a935 (Name: ). If a comment already exists with the same value, then the comment is not added. |
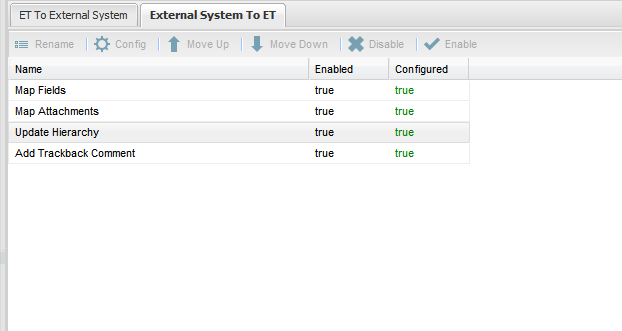
Note that all activities are pre-configured including the Map Fields activity. To view the fields that are pre-configured to synchronize, click on Map Field and then click Config from the toolbar.

The Configure Field Mappings screen will appear and a number of JIRA inbuilt fields have pre-set mapping to ET inbuilt fields. These are configured as either Copy Field or Automap field type mappings.
The Copy Field type mappings are already configured and the value will be copied from Enterprise Tester to JIRA on Synchronization:
Copy Field – Copy from External System: Name (field) to ET: Summary (field)
Copy Field – Copy from External System: Description to ET: Description (field)
Copy Field – Copy from External System: Created By (field) to ET: Reporter (field)
Copy Field – Copy from External System: Assigned To (field) to ET: Assignee (field)
The Automap field type mappings are also already configured. The Automap field type will update the ET field picklist with new values from JIRA when they are detected on a incident that is being synchronized from JIRA. Note that this feature does not update all new picklist values that have been added to JIRA but only those that have been detected on an incident that is being synchronized. See the Task section below for more information about automatically updating your picklist values from JIRA.
Automap Field – Automap from External System: Type to ET: Type
Automap Field – Automap from External System: Priority to ET: Priority
Automap – Automap from External System: Status to ET: Status
Automap – Automap from External System: Resolution to ET: Resolution
Automap – Automap from External System: Components to ET: Components
Automap – Automap from External System: Fixed Versions to ET: Fixed Versions
Automap – Automap from External System: Affected Versions to ET: Affected Versions
Adding New Field Mappings — Configuring Custom Fields
Custom Fields can be synchronized from ET. A little set up is required to selected and configure the fields that you wish to synchronize.
From the Map Fields screen, you can add a new field to you synchronization configuration. To do this click on Add on the Configure Field Mappings screen.
The Add Mapping dialog will appear.
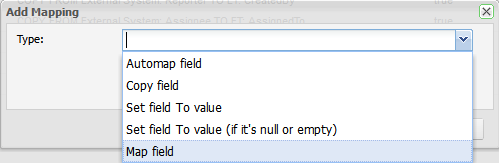
Select the type of mapping you wish to create:
| Type | Description |
|---|---|
Automap Field | Automap Field mapping will automatically map all matching field values in ET and JIRA so that it is not necessary to do this manually. In addition when synchronizing in the JIRA to ET direction, new field values detected on synchronize from your external system (JIRA) will be added to the ET field value picklist if they don't already exist. Using this type of field mapping eliminates duplicate field management in JIRA and in ET. It will also allow incident synchronization to complete even when map values already exist. This type of mapping is useful for fields like Versions and Components which tend to continually grow. This type of mapping should be used when your picklist values in ET and JIRA are the same. Supported field types include, Combo box (select lists), multiselect list, radio button groups and checkbox groups. *Note: that this feature does not synchronize the picklists between JIRA and ET but it does add values to the ET picklists when new values are detected on incidents during synchronization. |
Copy Field | Copy field will copy the text from your JIRA issue to the mapped field in ET. This is recommended when synchronizing text fields. |
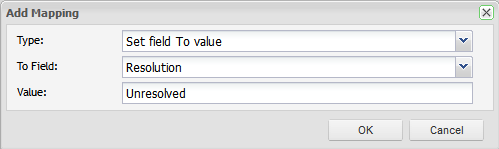
Set Field to Value | Set field to value field mapping allows you to specify a value to populate the field in ET with regardless of the values in JIRA. All Field types are supported. |
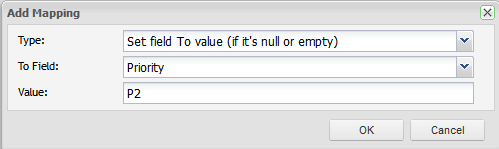
Set Field to Value (if it's null or empty) | Set field value field mapping allows you to specify a value to populate the field in ET with, if the field does not currently have a value set/is null. All Field Types are supported. This mapping type is useful for setting a default value, if the value was not populated by a previous mapping (and so when used in this way, the mapping should appear at the bottom of the list of field mappings). |
Map Field | The Map field option allows you to manually map the field values in ET with those of JIRA. This is useful when your your picklist values in JIRA are different to your picklist values in ET. ET will automatically map any exact value matches when first displaying the mapping configuration screen. Supported field types include: Combo box (select lists), multiselect list, radio button groups and checkbox groups. |
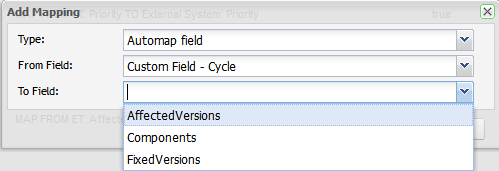
Automap
When configuring an Automap Type field, you will only need to select the JIRA and ET fields that you are mapping. Auto mapping should be used when your ET and JIRA picklist values are exactly the same, it will automatically map the exact matching values and when Synchronizing in the ET to JIRA direction it will also add new values detected from JIRA to your ET picklist.
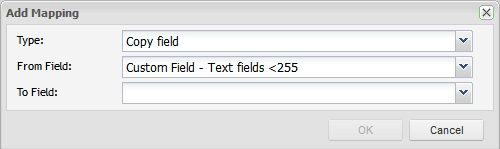
Copy
When configuring a Copy Field Type field, you will only need to select the JIRA and ET fields that you are mapping. The text or value from the source incident will be copied to the incident in the other system.
Set Field to Value
On synchronization you can set a value for a field to a specified value. You only need to specify the field in ET and the the value you would like to set.
Set Field Value to (if null or empty)
If the field value is null or empty can you set the field to be set to a specified value. For this configuration select the field and the value to set.
Map
When using the map field configuration, you will be required to manually map the field values. This is useful when the values in ET and JIRA are different or if you have more that one value that will map to the same value in the other system.
To complete this configuration, you will need to choose ET and JIRA fields whose values will be synchronized and then you will need to complete mapping any values that do not exist in the system that you are synchronizing to. All values that have exact matches in both systems will automatically be mapped.
Notes on Field Type Support for Automap and Map Mapping Types
The following field types from JIRA are not supported by the automap or map mapping types:
| Field Type | Notes |
|---|---|
Date Picker | |
Date Time Picker | |
Global Rank | |
Group Picker (multiple groups) | This field is not supported natively in ET so you will need to use either the copy or set value mapping types |
Group Picker (single group) | This field is not supported natively in ET so you will need to use either the copy or set value mapping types |
Hidden Job Switch | |
Job Checkbox | |
Labels | |
Text Field (multi-line) | |
Select List (cascading) | ET does not have a cascading field to map this to. The only cascading field selected is copied from the defect tracker the "copy" mapping supports this field. |
Text Field (read only) | |
Text Field (single line) | |
URL Field | |
User Picker (multiple users) | As there may be many users in the picklist, this is not suitable as a target for the "map" mapping type. The copy mapping could be used but the same username must exist in both ET and JIRA. |
User Picker (single user) | As there may be many users in the picklist, this is not suitable as a target for the "map" mapping type. The copy mapping could be used but the same username must exist in both ET and JIRA. |
Another point to note when configuring your field mapping configuration for "Automap" or "Map" type mappings is that you may need at least one value in your JIRA picklist (configurable set of allowable values) for the field (drop down list, checkbox list etc.) for the field to be detected as a configurable field for these mapping types. After adding your value(s) to JIRA you may need to perform a refresh lookups before the field will be detected.
Tasks
In addition to synchronizing requirements and incidents between JIRA and ET you can also set up tasks to synchronize picklist field values. A good example of when this would be useful are the fields Versions and Components.
Versions and components are normally being added to over time — and this can be a burden to then have to replicate these changes in Enterprise Tester manually.
A good way of managing the consistency of of the field values in JIRA with the field values in ET is to set up a task to update the full list of picklist values on synchronization. This will ensure that your picklist values are always up-to-date with the field value list in JIRA without having to manually manage the task.
By default, tasks are pre-configured for versions and components.
This feature supports both inbuilt and custom fields. The following field types are supported: combobox (single select list), multi- select list, checkbox group, radio button group.
To set up a picklist synchronization task. Navigate to the Task tab on your project link configuration screen.
Click on Add from the toolbar and enter in a name for your task and click OK.
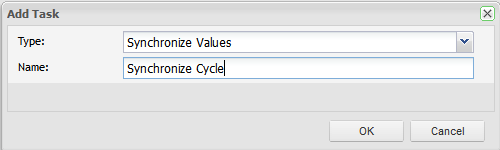
Next, select your JIRA Field and your ET Field and click on Save.
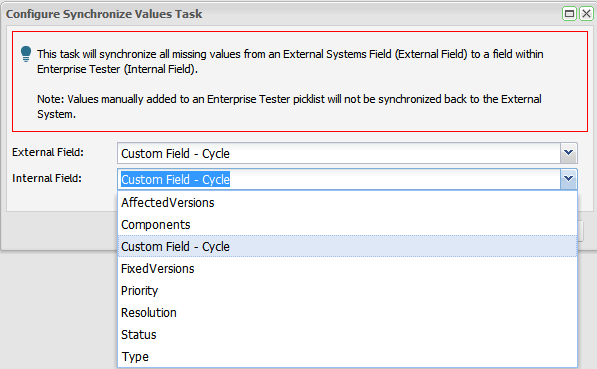
The task is then created, and is displayed in the tasks grid.
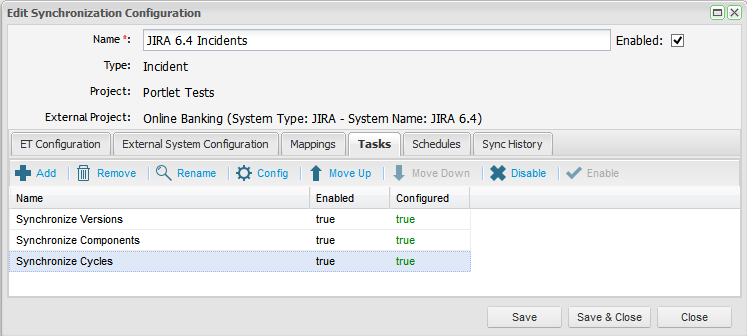
From the grid you can see that you are able to configure or disable/enable each task.
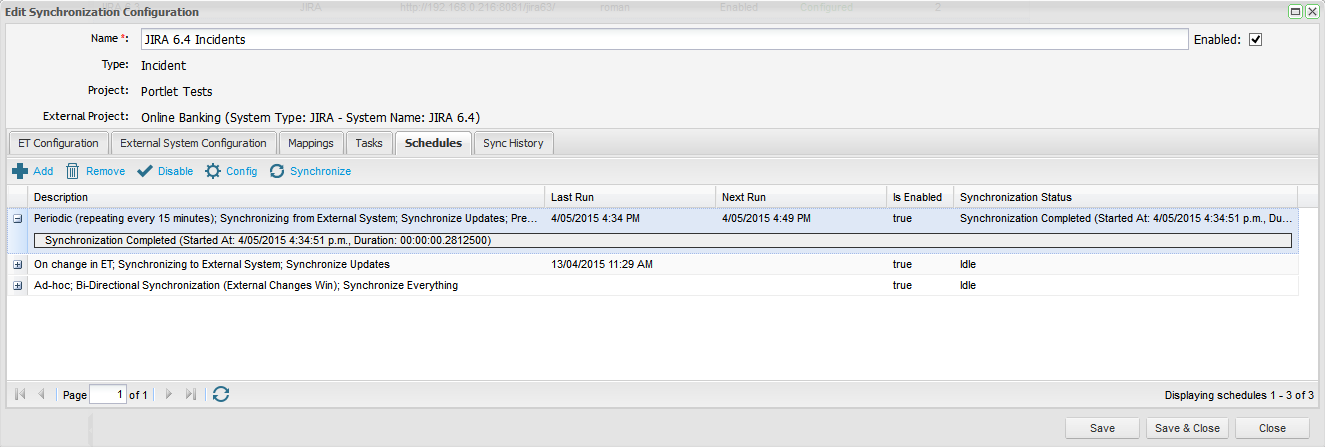
Scheduling Synchronization
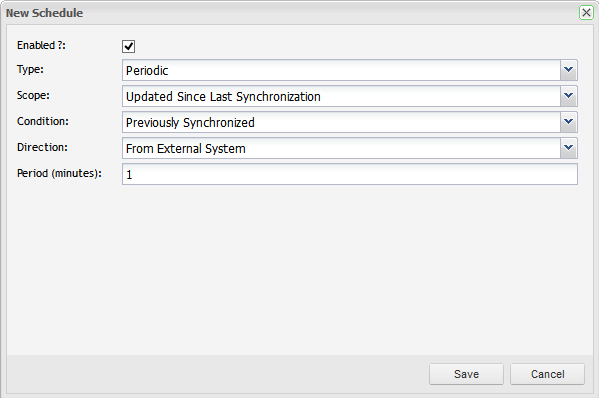
Now that your configuration and field mappings are complete you are ready to synchronize. By default, for incidents, the following schedules are pre-configured. These schedules replicate the functionality that was available in V4.8 and earlier:
- Periodic schedule occurring every 1 minute, from the external system which will update all incidents that have been updated since the last synchronization. This is conditional on having been previously synchronized.
- Synchronize on change in ET in the direction of ET to JIRA. A sychronization of all incidents added or updated in ET since last synchronized will be initiated at the time a change occurs to an incident. This synchronization only updates JIRA with the changes made in ET.
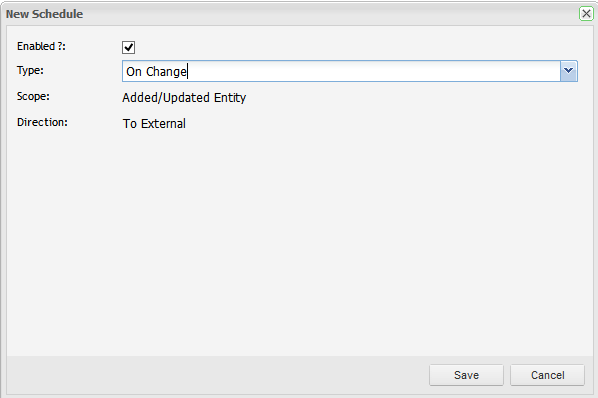
The synchronization frequency can also be configured from the Schedules tab. There are 3 options that can be configured:
- Adhoc
- Periodic
- Daily
Type | Scope | Direction | Period | Time |
|---|---|---|---|---|
Adhoc | You can choose to only update entities since the last synchronization or synchronize all. | Four options: | N/A | N/A |
On Change | The scope can not be changed — it will only synchronize those incidents which have just been changed in Enterprise Tester. | Only supported in the ET to JIRA direction. | N/A | N/A |
Periodic | You can choose to only update entities since the last synchronization or synchronize all. | Four options: | Specify the synchronization frequency in minutes. | N/A |
Daily | You can choose to only update entities since the last synchronization or synchronize all. | Four options: | N/A | Specify the time using the (24hr clock) when the synchronization will occur daily. |
Once you have configured your synchronization frequency, a summary of the configured synchronization schedules is available. You can see the time of the Last Run, the Next Run (if applicable), whether the schedule is enabled or not and the current Synchronization Status.
You can use the tool bar to add a new scheduled synchronization, delete an existing configuration, enable or disable an existing schedule, configure an existing schedule or manually initiate a synchronization.
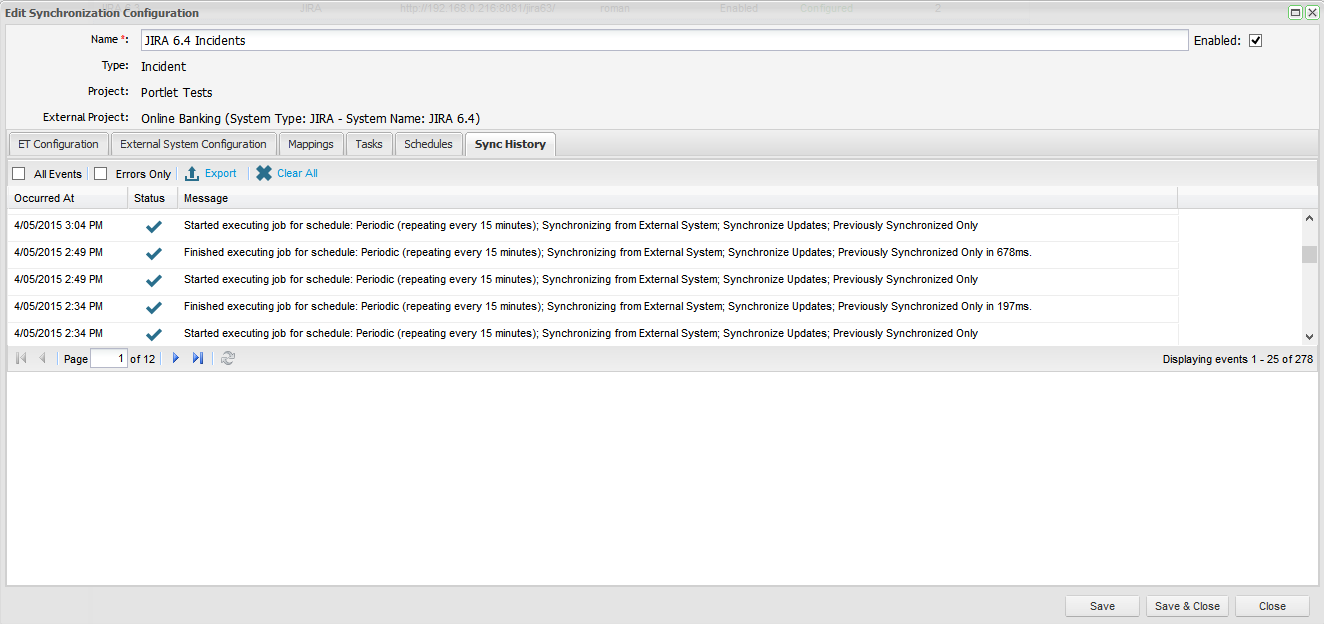
Synchronization History
You can view the synchronization history from both the synchronization configuration screen and the individual synchronized entities. From the configuration screen you can view all synchronization events, select to only view errors, export the synchronization events to a .CSV file or clear the history.
Deleting Project Links
Deleting project links will stop the synchronization between Enterprise Tester and your external system. When deleting the link you will have the option to delete the link and remove all external link references or to retain these references.
If you delete and elect to "keep references" then previously synchronized entities will still list the remote entities (JIRA issues/TFS work items) that they have been synchronized to, in their remote links list.
Even if you chose to remove references, this will only apply to Enterprise Tester, JIRA issues will still contain trackback links and remote links referring the Enterprise Tester entity they were synchronized with. This information must be removed manually.

Limitations
When synchronizing from JIRA to ET, links between issues in JIRA are not synchronized to relationships in ET.
Auto-map from ET to JIRA is only supported for the component and version fields, and its use is generally discouraged (adding versions and components to your defect tracker generally makes more sense, so that you can populate additional information such as component lead, due date etc. — which Enterprise Tester does not support).