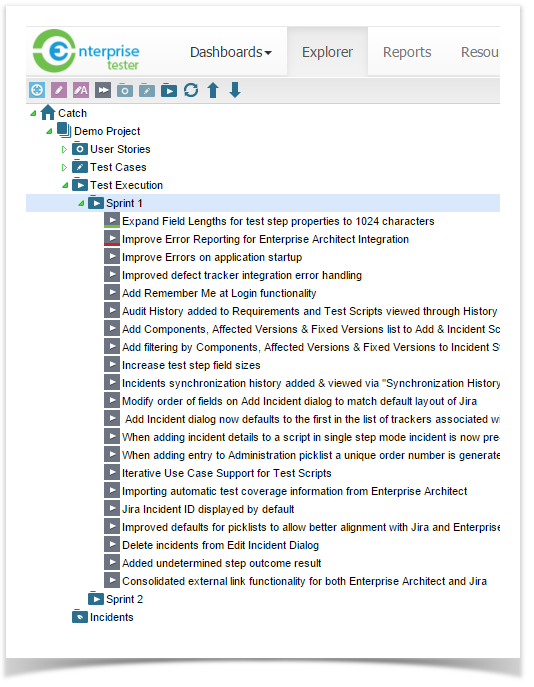
Create Test Execution Data
Using the Test Scripts you have already created, add them to the Execution Set folder for your Project, to do this you can:
- In the tree, select a single Test Script or an entire Test Script folder from
You can add individual test scripts or entire packages of test scripts to a test execution package. To do this:
...
- the Script Library and drag it to
...
- your Test Execution folder.
Or
- From the grid, tick one or more check boxes to select Test Scripts, click the Create Execution button in the tool bar, select the destination folder.

The selected Test Scripts will The package/script and all its contents will then be copied into the destination execution package/ plan. You can also move scripts within the execution packages and plans in the same way by dragging and dropping.folder, ready for Test Execution.
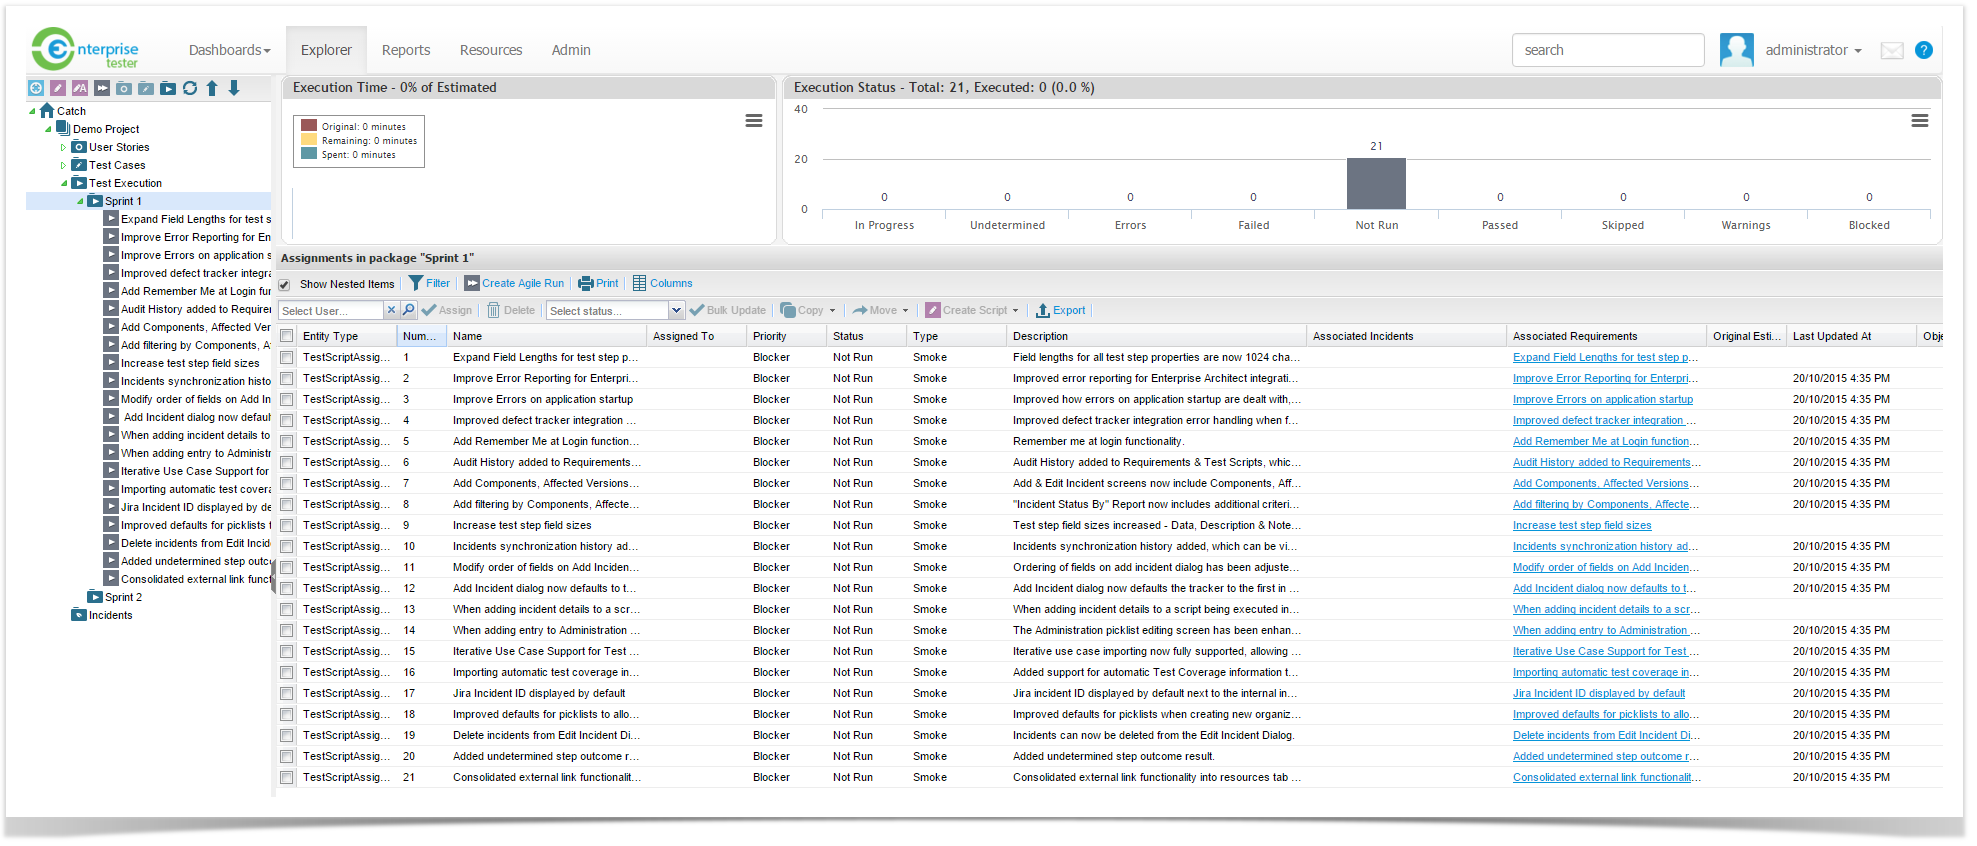
Once Test Execution data exists in a folder, you can view information of the related script including: Script Description, Objects, Pre and Post Conditions, Notes and all custom fields.
Organizing Test Execution Data
You can reorganize information within the Test Execution folders by dragging and dropping via the tree, or from the grid tick one or more check boxes to select Test Execution data and click the Move button in the tool bar, select the destination folder.
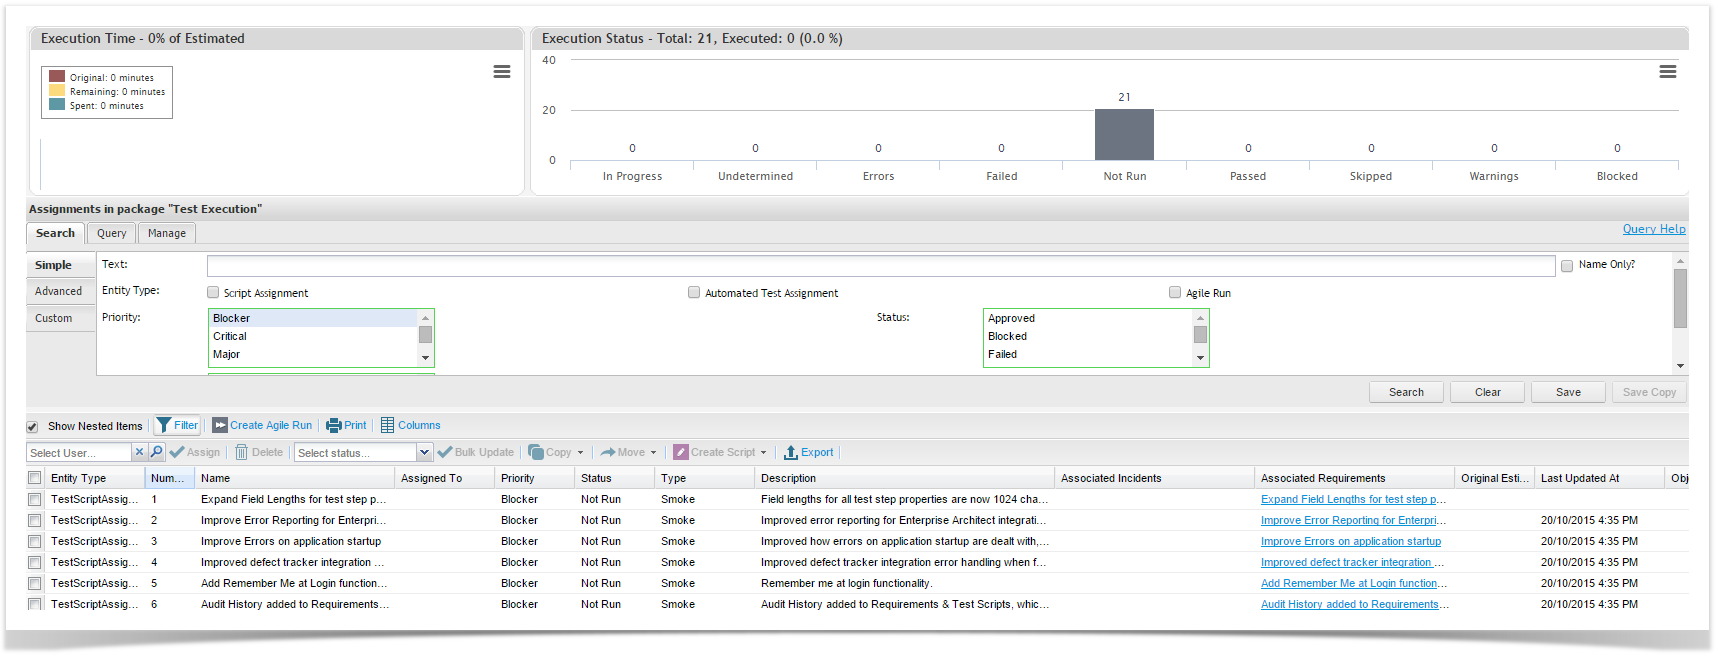
Where a large number of tests have been created within a single folder, it may be helpful to filter these records into more manageable groups.
To do this:
- Double click the Execution Set folder.
- Click on the Filter button and select the criteria to filter by.
- Click on Search to filter records and display results.
 Changes made to an existing script in the script library will automatically update the corresponding script(s) in the execution set with the status of “Not Run”. Current and historical runs will not reflect the new changes. A new run of a previously executed script will reflect the new changes.
| Tip |
|---|
Test scriptsScripts can be copied from one project to another. Script Assignments in theExecution Set data can only be created from scriptsTest Scripts within the same projectProject. |
Choose a Test Execution View
You can execute the steps for each test tests in a grid view of containing all steps, or in a single step view.
To choose which view your screen defaults toyour default view, go to My Profile and update the Default To Single-Step Execution setting.
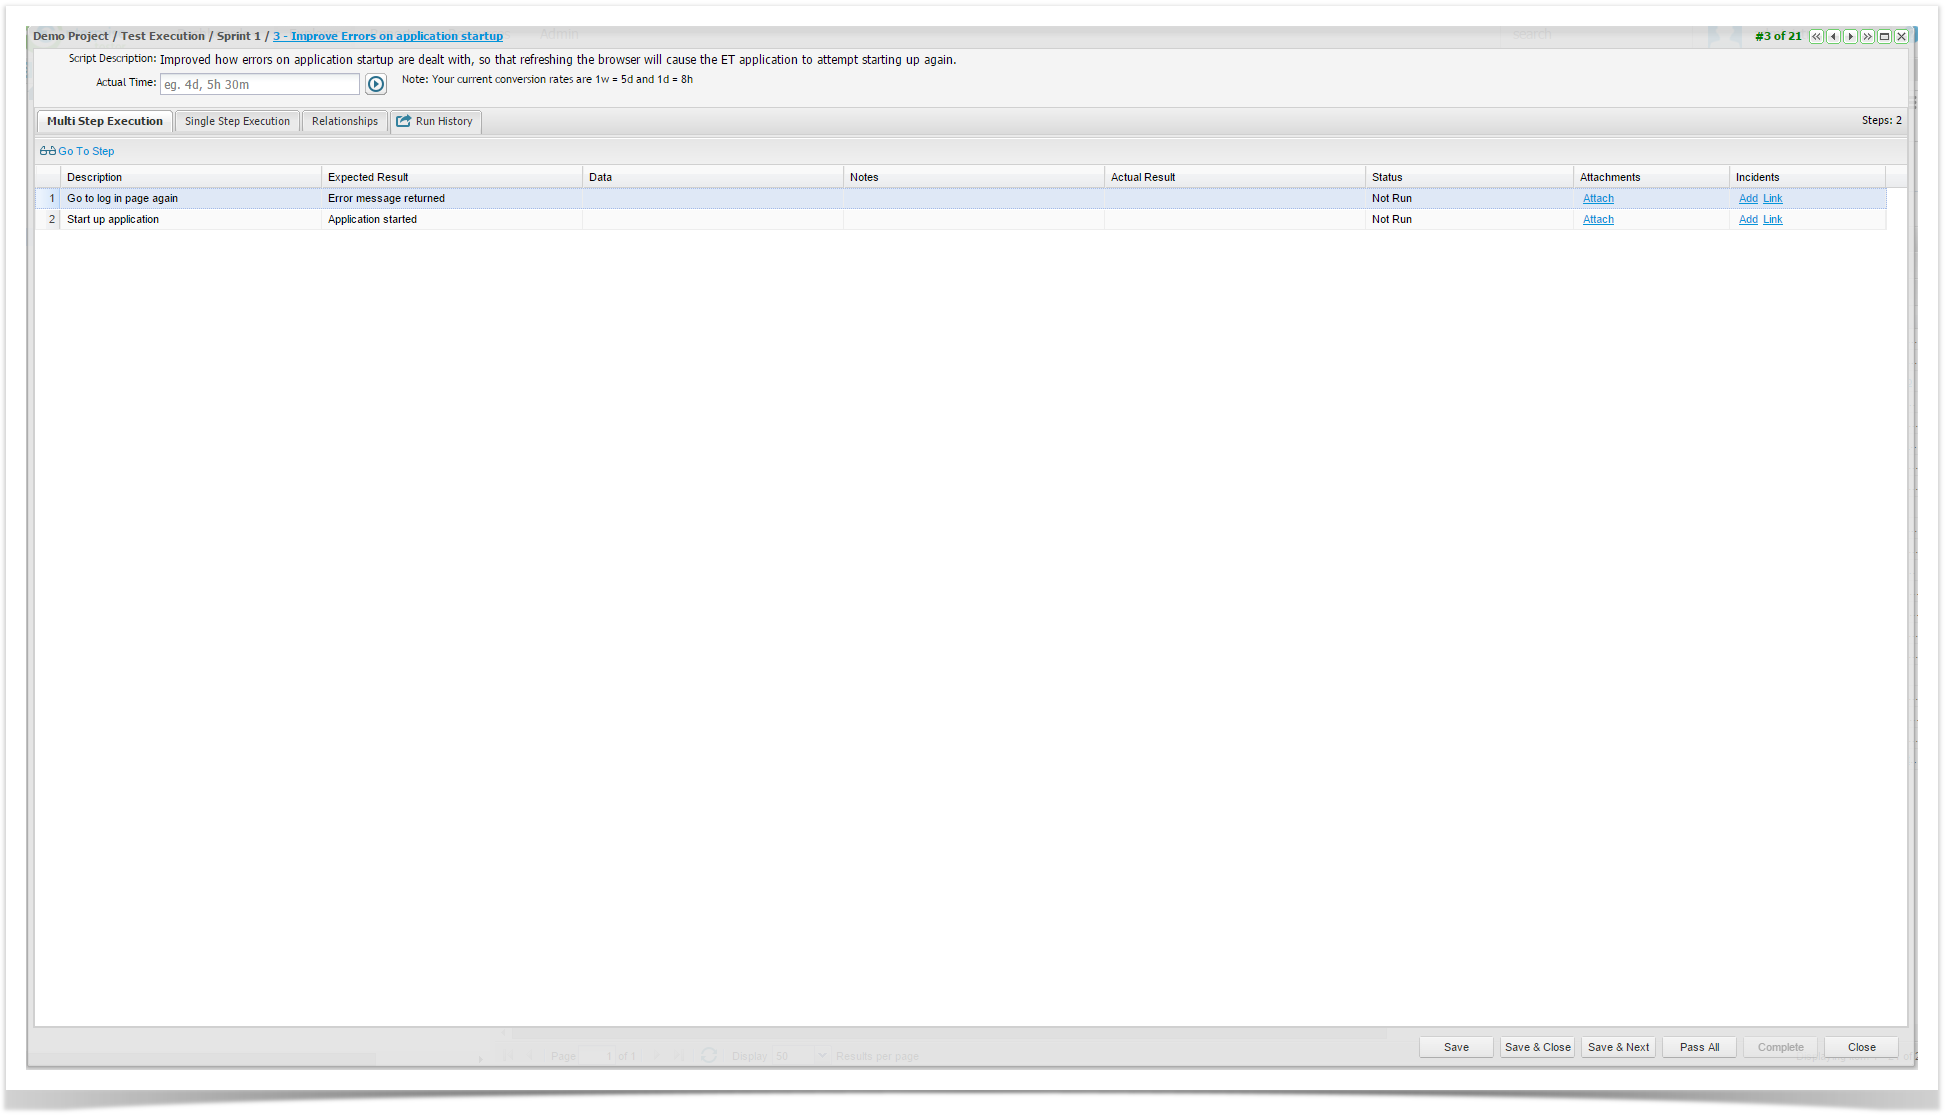
Multi Step Execution
...
To do this:
(Grid View)
Double click on the test to be executed.
Select the Multi Step Execution tab.
- Type in the results and select the status for the test step.
- Attachments can easily be added to each step.
- Incidents can be added or you can link to an existing incident in Enterprise Tester or your external system.
- In the title bar there is a link to the related Test Script. If you have permissions you can click on this link and update the Script or you can edit the Test Execution data directly which will update the Test Script automatically.
- A stop watch feature is included for recording actual time spent testing. You can start and stop the time as required, close and come back to the run at a later time.
- The Run screen allows you to easily navigate to the next or previous scripts by using the arrow buttons located in the top right corner.
- Save and Next button allow you to move to the script on the list on your summary screen.
- Testers also have the option to change the status of all steps to Pass by clicking the Pass All button and click on Save.
- The test execution will be saved. To view more information on the test step, click on the plus button to expand the individual steps to provide more information.
Single Step Execution
If you use Single Step Execution you run through a number of screens, one for each step, to complete the script.
- Double Right click on the test to be executed.
- Select the Single Step Execution tab.Type in the results, notes and select the status for the test step etc.
- Click on ‘Save’.
This section covers the running tests assigned to the execution set. From the script assignment you can view all information from the related script including: Script Description, Objects, Pre and Post Conditions, Notes and all custom fields.
Enterprise Tester provides a number of ways to run tests and you can choose to record your test results by using the single step mode or the multi-step mode.
You can start your test run in a number of ways:
...
...
- All the details from the master test case in the Script Library are available while testing. In the title bar there is a link to the original master script/ test case in the Script Libraryrelated Test Script. If you have permissions you can click on this link and update the script while execution the testthe Script or you can edit the Test Execution data directly which will update the Test Script automatically.
- A stop watch feature is included for recording actual time spent testing. You can start and stop the time as requirerequired, close and come back to the run at a later time and start the time from where you left off. You can activate the timer by clicking on the play button next to the Actual Time field.
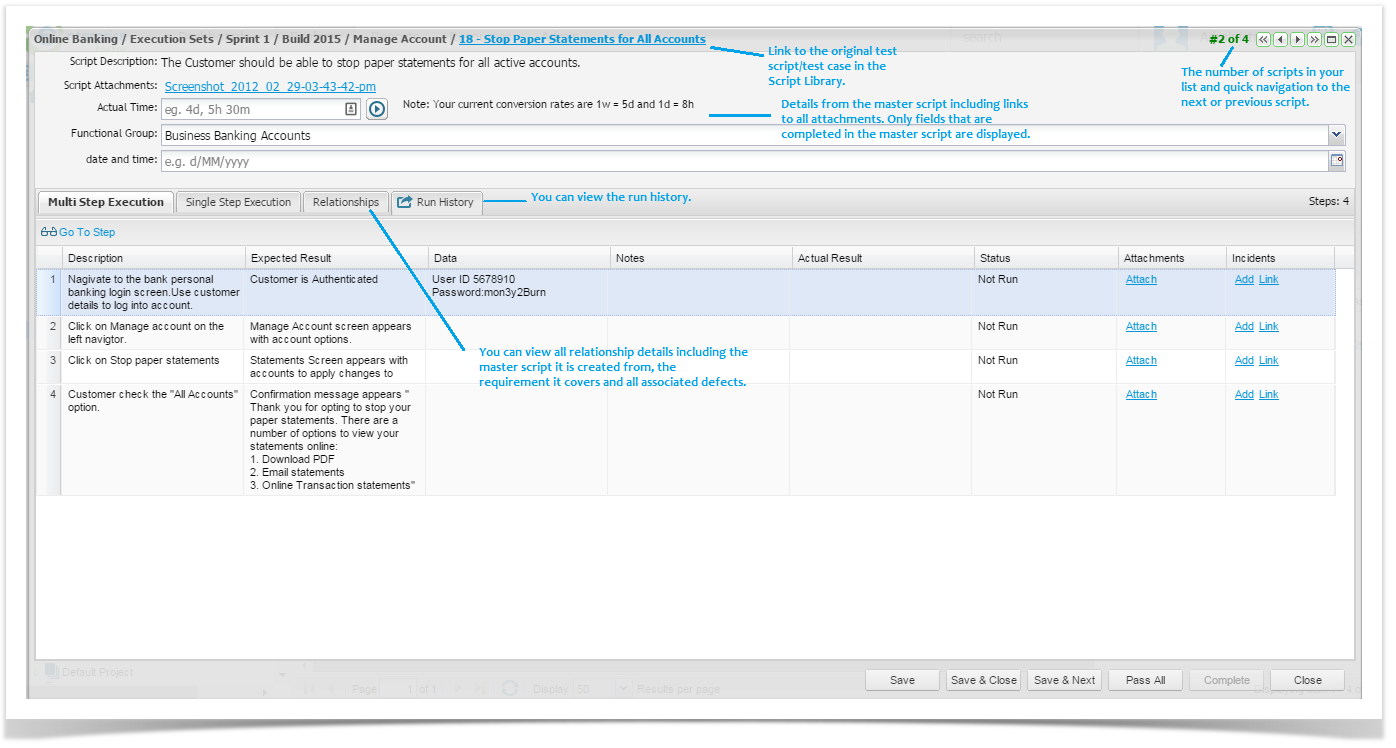
Note - When you are running a number of scripts listed in the summary grid view, you can easily see how many scripts are left to execute when recording your test results. The Run screen allows you to easily navigate to the next or previous scripts by using the arrow buttons located in the top right corner.
- The Relationships tab shows all associations with this script run including the original master script Type in the script libraryresults, the requirement that the script covers and any associated incidents raised during testing.
- The Run History tab shows the details of all previous runs including the version of the script used for the run.
- Save and Next button allow you to move to the script on the list on your summary screen.
Edit Test Cases During Test Execution
You can now edit Test Script information while you are executing a Test if the correct permissions are assigned.
Execute All Tests
- notes and select the status for the test step etc.
- Click on ‘Save’.
Ways to Start Test Execution
You can start your test run in a number of ways:
- Double click Test Execution data on the grid.
- Double click Test Execution data in the Explorer tab via the tree.
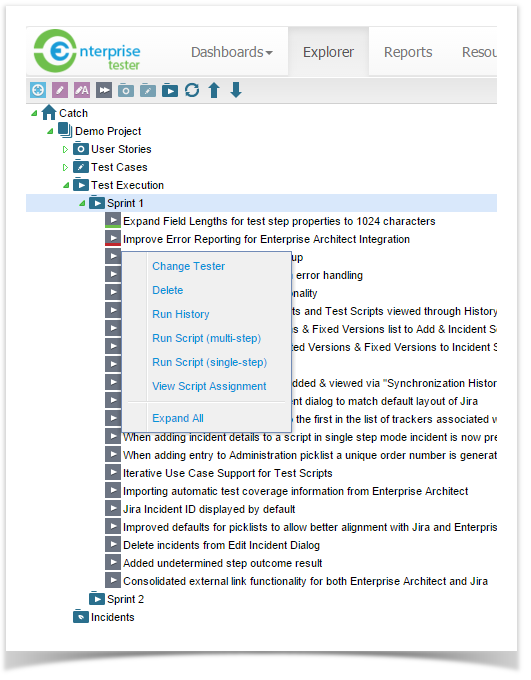
. - Right click on the Execution Data and select either 'Run Script (multi-step)' or 'Run Script (single-step)' from the menu.
Edit Test Scripts During Test Execution
When performing Test Execution, you can automatically edit the following fields of a Test Script provided the correct Permissions have been given:
- Description
- Expected Results
- Data
- Notes

Permissions that will allow users to update Test Scripts during Test Execution are:
- Manage Scripts View and Edit
- Manage Executions View and Edit
- Execute All Tests / Execute Only My Tests
Test Script Edit 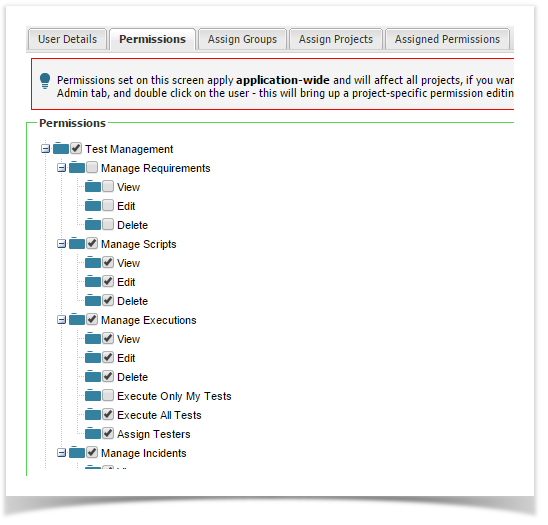
If Test Execution Edit
If a Test Script has been completed then users cannot update Description, Expected Results, Data, Notes and Status fields.
Actual Results data and attachments can be added at any time.
The following fields can be edited during Test Execution if correct permissions are assigned and if the Test Script has not been completed.
Description, Expected Results, Data, Notes
Updated information will be saved to the related Test Script.
Actual Results data and attachments can be added at any time.
Filtering Tests
Where a large number of tests have been created within a single package, it may be helpful to filter these records into more manageable groups. To do this:
- Expand the execution set to the package or plan containing the test scripts.
- Double click the package/plan or right click and select view/edit package/plan.
- Click on the Filter button and select the criteria to search/filter by.
- Click on Search to filter records and display results.
Prevent Editing Test Scripts During Test Execution
To stop users from automatically updating Test Scripts while performing Test Execution:
Remove the Manage Executions Edit permission.
How Test Script Changes Affect Test Execution
If Test Execution data is created where the status is “Not Run” and the related Test Script is subsequently changed, your Execution data will be updated to reflect changes made in the Test Script.
If your Test Execution is mid-run, and the related Test Script is changed at the time the test is being run, your Execution data will not be changed automatically.
If a Test Execution window in mid-run is closed and re-opened, and if the related Test Script has changed in the interim you will be prompted to either continue or restart the run.
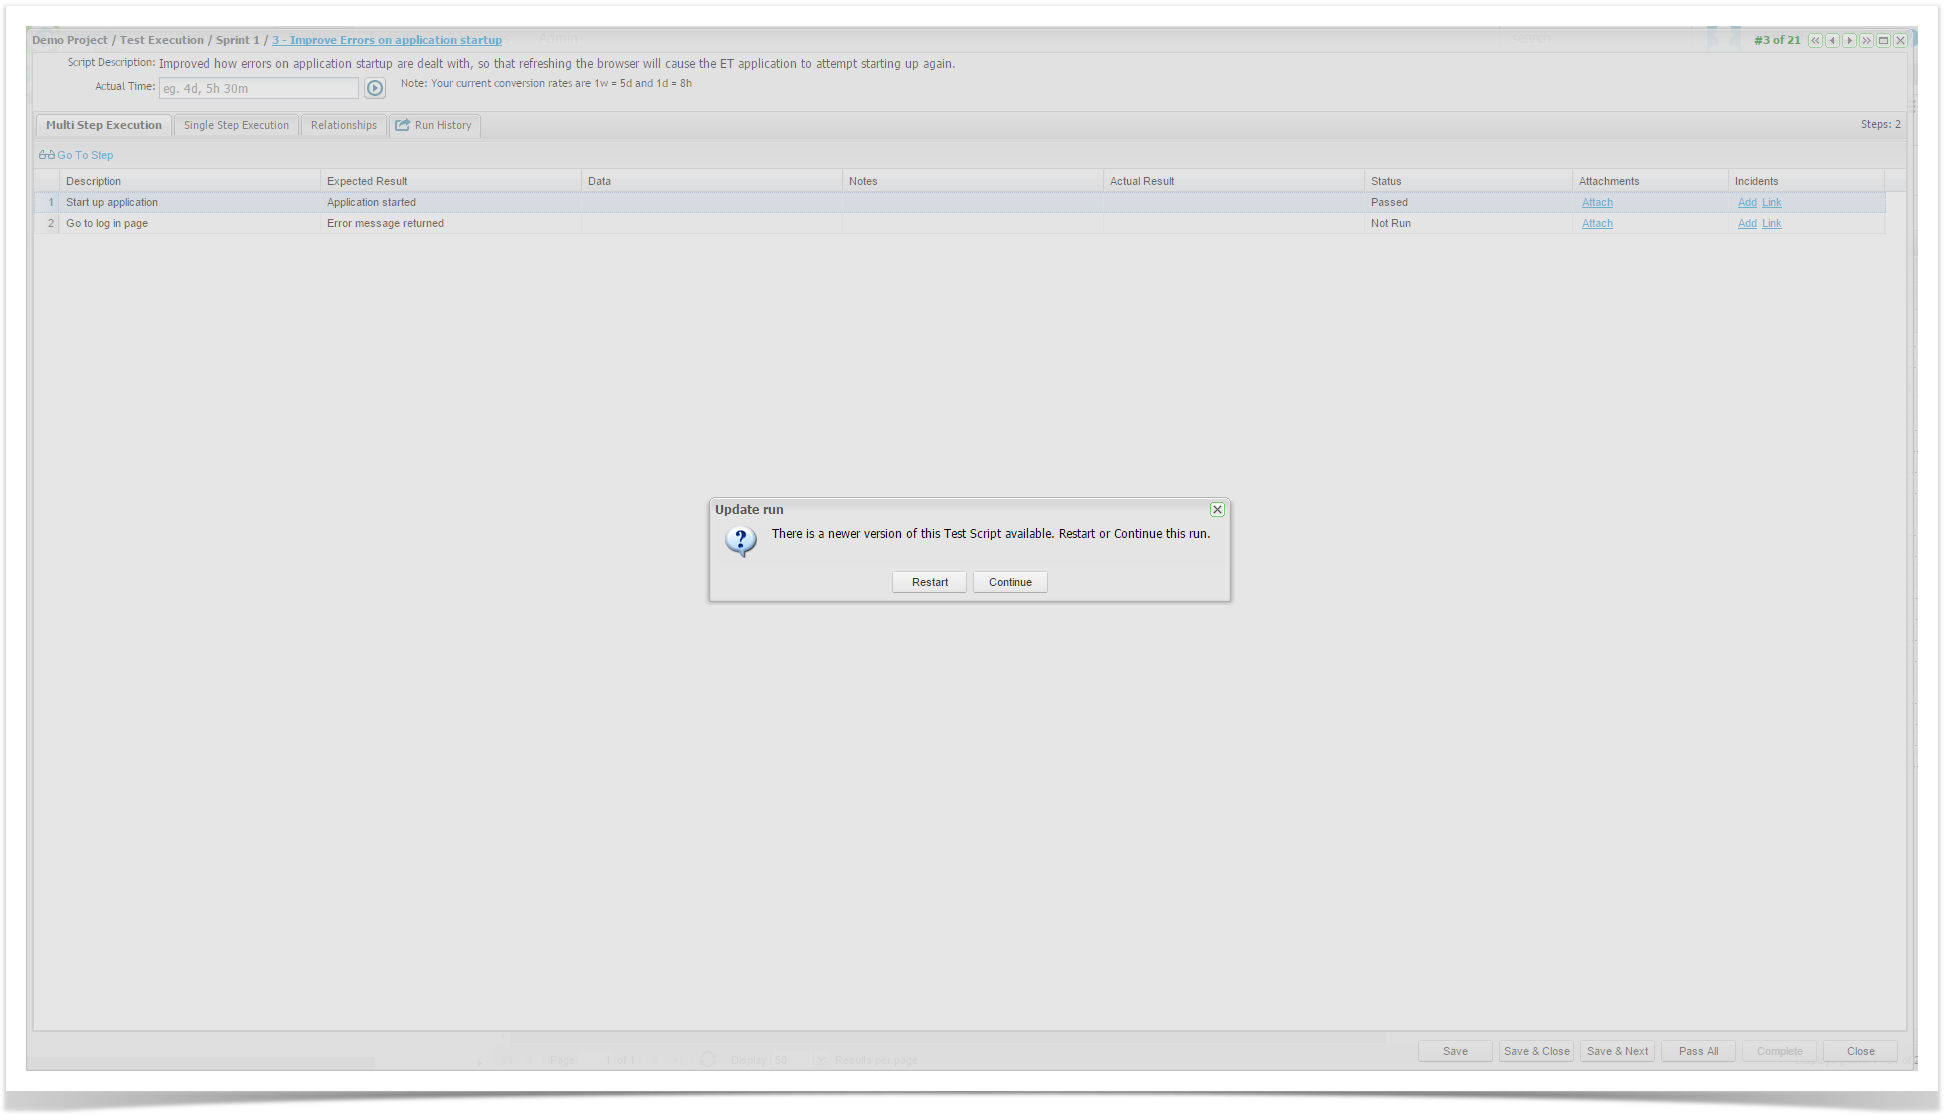
Historical runs will not be affected.
Relationships
You can view Test Execution relationships from the Relationships tab.
Test Execution relationships are automatically inherited from the related Test Script, which may in turn have other associations.
If an Incident is logged during Test Execution, a relationship to that Incident is automatically created.
Run History
The Run History tab shows the details of all previous runs of this Execution data including the version of the Test Script that was used.