GIT is a popular DVCS (Distributed Version Control System) - supported by Enterprise Tester version 4.4 and above.
Setup
Installing GIT for Windows
To setup GIT integration, you must first install Git for Windows - which can be downloaded from the git-scm.com website.
Once downloaded, run the installation on the Enterprise Tester server.
Last of all, you will want to add the git "bin" folder to your path, to do so:
- Go to Control Panel -> System & Security -> System -> Advanced System Settings -> Environment Variables.
- In the System Variables section, locate "Path".
- Click the edit button, then append the full path to the "bin" folder in your git installation directory (where git.exe exists) to the URL, prefixed by a semicolon.
- Click OK to save changes.
You should now be able to launch a command prompt and type "GIT" and see a version message like so:
C:\> git

usage: git [--version] [--exec-path[=<path>]] [--html-path] [--man-path] [--inf-path]
           [-p|--paginate|--no-pager] [--no-replace-objects] [--bare]
           [--git-dir=<path>] [--work-tree=<path>] [--namespace=<name>]
           [-c name=value] [--help]
           <command> [<args>]

....
Cloning your Repository
Next you need to clone your repository to a local directory on your Enterprise Tester machine. It the case of bitbucket or github, you can find the URL and directions on how to clone your repository on the home page for the repository.
If you intend on using SSH with a service such as github or bitbucket then you will need to:
- Login to the server using the same username as the identity configured for the application being used by Enterprise Tester.
- Generate an SSH Key (be sure to NOT password protect the SSH Key)
- Add it to your github or bitbucket account.
Github provide a handy guide on how to generate an SSH Key.
At this point you should now be able to clone the repository to a local directory of the machine - so commence with the clone, here an example of cloning from bitbucket:
git clone https://jbloggs@bitbucket.org/jbloggs/jbloggs_et_project.git
Once cloned, you may need to switch the branch of the repository to the branch you want Enterprise Tester to commit to (this can be done using the git checkout command).
git checkout QA
Check Commit Works
Once you have cloned the repository, we suggest performing a test commit (this will allow you to ensure that if using SSH, git does not prompt for a password when committing, and allows you to permanently accept SSH/SSL certificates etc.)
You can do this by:
- Creating a new text document call test.txt in the working directory.
- Executing the command: git add .**
- Execute the command: git commit -m "test commit"
- Execute the command: git push
You should see the new file is added to the remote git repository on the correct branch.
Setup
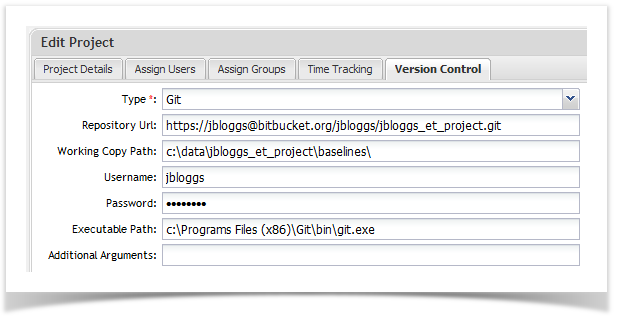
You are now ready to configure Enterprise Tester at either the project or organisation level - a standard GIT configuration when using a git repository hosted on bitbucket may look like this:
Testing
Once you have setup the configuration for your project, you can test the connection by creating a baseline for a small requirements or scripts package. You should be able to confirm it worked by checking the list of recent commits for your git repository on the remote server.
How it Works
The command flow executed by the synchronizer when creating a baseline for a project with git integration turned on is:
- git rev-parse (used to confirm working directory is part of a git repository)
- git pull or git pull {url} (if repository url specified in config)
- git add {filename}
- git config user.email "{email}" (if user.email not configured globally or locally for repo)
- git config user.name "{full name}" (if user.name not configured globally or locally for repo)
- git commit -m "{commit message}"
- git push (will use default remote configured for local branch via track, you can also manually configure this as per this stackoverflow post)