Before you Begin
By default Enterprise Tester stores attachments in the file system from V4.3 and above. Note that the original installation must be V4.3 (released September 2012) and above. In this case, you do not need to make any additional configurations to your system unless you would like to change the default file storage location or the maximum file size. See the Additional Configurations section below.
Where the original installation of ET was a version earlier than 4.3 then the default attachment storage is in the database and you will need to migrate the attachments from the database in addition to making the changes to the web.config file described below. Failure to migrate your attachments from the database after changing the attachment storage method will make those attachments in the database unavailable to users and will leave your system with attachments in both the database and the file system. The migration process described below will not migrate attachments from the database if new attachments are already being stored in the file system. In this case, please contact Catch Support for assistance.
Before running the AttachmentMigrator tool ensure you backup the following;
- Enterprise Tester Database
- Enterprise Tester file directory (where Enterprise Tester is installed i.e. (c:\Program Files\Catch Limited\Enterprise Tester\)
Changing Attachment Storage from Database to File System
Enterprise Tester provides a mechanism to migrate between storing attachments in the file system or database for an existing instance of Enterprise.
Migrating from In-database to the file system
To store attachments in a location other than /Data/Attachments, you will need to add the "attachment.storage.path" setting to the web.config file (ensure the attachment storage method remains the same).
1) Download EnterpriseTester- xxx-BIN.zip
2) Go to the properties of the zip file and select Unblock.
Select Apply.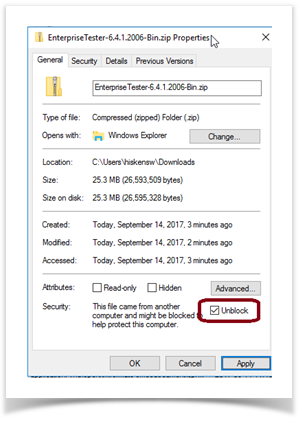
3) Extract the EnterpriseTester-XX-BIN.zip file.
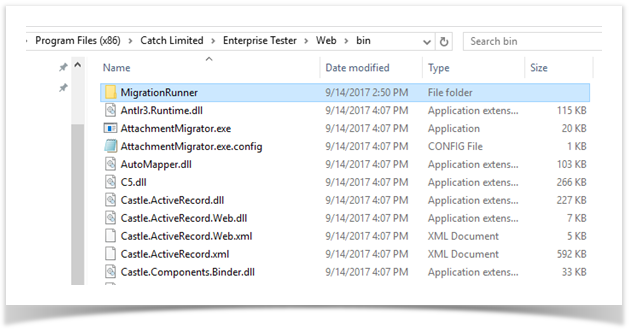
4) Copy all the files from the unzipped BIN directory to Enterprise Tester
i.e. c:\Program Files\Catch Limited\Enterprise Tester\web\bin

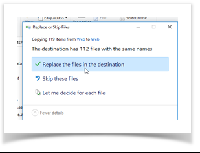
5) Replace all the files in the destination folder
6) Create a new folder inside the BIN directory called “MigrationRunner”.
NOTE: Do not put a space between Migration and Runner
7) Copy all files from the Bin directory into the MigrationRunner directory
8) Copy the web.config file from the Enterprise Tester\Web directory to the Enterprise Tester\Web \Bin directory
9) Stop IIS
10) Go to …\Catch Limited\Enterprise Tester\Web\bin\MigrationRunner directory and run the AttachmentMigrator.exe
executable. The following message will appear :
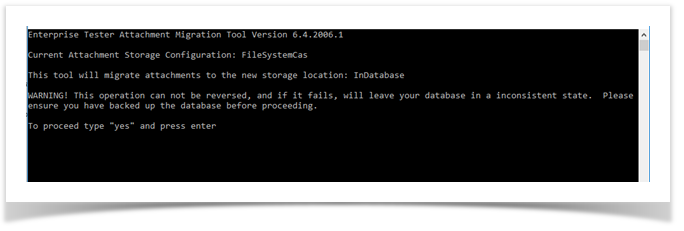
As the message suggests, you should always backup both your database and web.config file prior to using this tool - as if it fails halfway through, it will leave your Enterprise Tester database in an inconsistent state.
11) Type yes and press <Enter> to proceed.
You will then see progress displayed on screen, and eventually the migration will complete.
 12) Copy the web.config file
From - …\Catch Limited\Enterprise Tester\web\bin
To - …\Catch Limited\Enterprise Tester\web\.
This has the change made to the attachment.storage.method so the attachments are now stored in the file system.
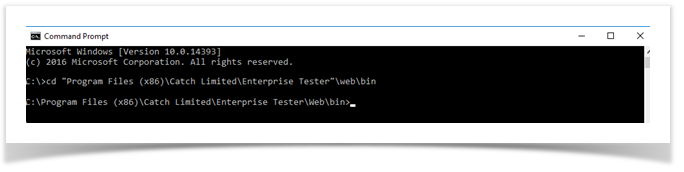
13) Open the command line and run the following
cd\Program Files (x86)\Catch Limited\Enterprise Tester\web\bin
14) Now run postinstall.exe ziprelease
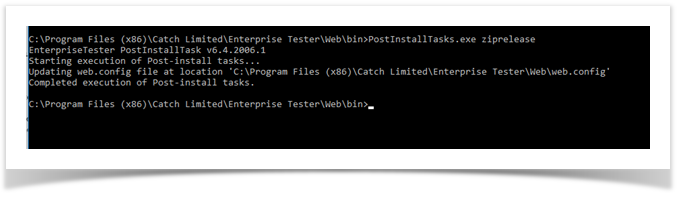
15) Restart IIS or the application pool, and your attachments will now be stored in the new location.
If you are migrating from file system to in-database storage, you will need to manually delete/archive the attachment files after the migration.
Additional Configurations
Changing the Attachment Storage Location
By default, attachments are stored in the folder ../Data/Attachments/ (so normally c:\Program Files(x86)\Catch Limited\Enterprise Tester\Data\Attachments)
If however you wish store attachments in another location (i.e. if you have a lot of attachments and wish to store them on a NAS disk) you can set the path by adding another entry with the key "attachment.storage.path".
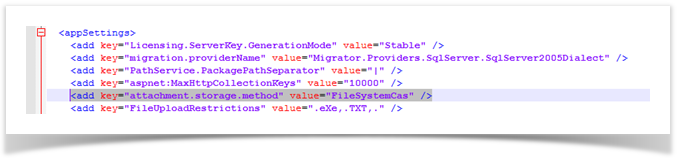
<appSettings>
<add key="migration.providerName" value="Migrator.Providers.SqlServer.SqlServer2005Dialect" />
<add key="attachment.storage.method" value="FileSystemCas" />
<add key="attachment.storage.path" value="f:\et-attachments\" />
</appSettings>
For more information of appSettings, see the help topic appSettings.
Setting Maximum File Sizes
To support the attachment of very large files change to the configuration of the application are also required. By default Enterprise Tester sets a limit of 64mb for requests. To support attaching larger files you will need to change this value.
In the web.config file, locate this section:
<system.web>
<httpRuntime executionTimeout="18000" maxRequestLength="65535" />
The value "maxRequestLength" controls the maximum size of requests in kilobytes, changing this to value such as 1024000, will allow you to upload files up to 1gigabyte in size.