Introduction
This guide provides information on how to backup data from Enterprise Tester, and how to migrate from the trial version database to another version of sql server.
Backing up data from your trial version of Enterprise Tester.
Enterprise Tester, when installed via the MSI file, will use Sql Server Express Edition 2005 to store it's data, making use of a feature of sql server express, which allows attaching a database file upon connect. While trialing and evaluating Enterprise Tester this provides a simple set-up, which makes it easy to uninstall the product cleanly at a later date, or to apply updates.
To backup your data while in this set up, the easiest approach is to stop the sql server express database server, copy the data files, and restart it again.
Stopping Sql Server Express
You can stop the Sql Server Express Edition server, by loading the services snap-in:Start -> Control Panel -> Administative Tools -> Services
Once loaded, locate the sql server express service, which normally has the name:SQL Server (SQLEXPRESS)
Right click, and select "Stop". This will stop the service, which will allow the database files to be copied.
Copying the data files
Open windows explorer, and browse to the data folder of your Enterprise Tester install folder i.e. c:\Program Files\Catch Limited\Enterprise Tester\Data\
In this directory will be two files:
EnterpriseTester.mdf
EnterpriseTester_log.LDF
Copy these two files to another location, these are the backup files which you can restore at a later date if something goes wrong.
Restarting the Sql Server Express database server
Once your have completed the backup, right click on the "SQL Server (SQLEXPRESS)" service, and select "Start" to restart sql server express edition, at which point you can start using Enterprise Tester again.
Migrating your trial database to a be a permanent sql server Database
Introduction
When putting Enterprise Tester into production use, it's recommended that you stop using the default "attach on connect" approach employed by the msi installer, and instead instantiate a permanent Sql Server or Sql Server Express database.
Advantages of permanent database
The advantages of doing this include:
Your database administrator can handle configuring scheduled daily backups and maintenance.
You can query the database using reporting tools.
You can easily backup and restore snapshots of the database to create test / training versions of ET.
Before you start
Before starting the migration - you must have the sql server management studio tool available.If you do not, it can be downloaded and installed from microsoft:
These instructions assume the tools are installed on the same machine as Enterprise Tester.
Step 1 - Restart or Stop IIS
Either through IIS Manager:
Click on Start -> Control Panel -> Administrative Tools -> Internet Information Services(IIS) Manager
Right click on local machine node (should have the same name as your computer) and select Stop, or in IIS6, select All Tasks -> Restart IIS.
Alternatively you can open a windows command prompt and type "iisreset" - this will stop and restart IIS on the local machine, if you have the IIS command line tools installed.
Step 2 - Attach the database files in Sql Server Express.
Sql Server not Supported
These files cannot be directly attached in the Standard or Enterprise editions of Sql Server, the data files use compression which is incompatible with the non-express editions of Sql Server - so you must first attach them in the Express Edition of Sql Server, then create a backup of the databases, which can be restored into any version of Sql Server.
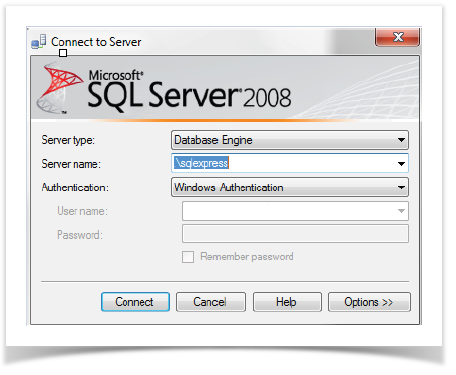
Start Sql Server Management Studio or Sql Server Express Management Studio.
When prompted to connect, connect to the .\sqlexpress database.
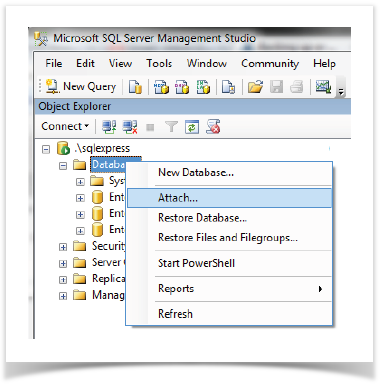
Once connected, right click on the "Databases" folder and select "Attach".
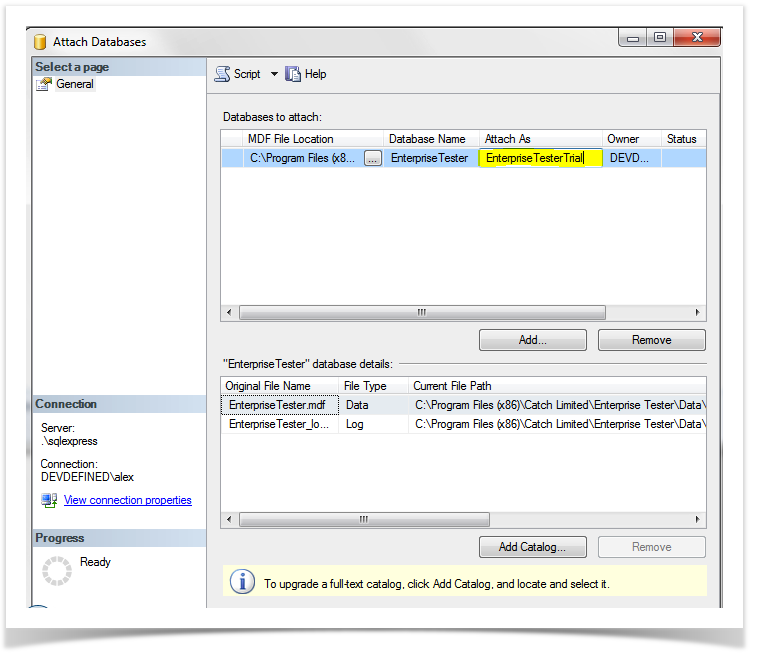
The attach database dialog will appear. Click the "Add" button to attach the database file, browse to the Install folder of Enterprise Tester, and select the Data\EnterpriseTester.mdf. Normally the database is located in “C:\Program Files\Catch Limited\EnterpriseTester”.

Once the file is selected, the attach database dialog will look like this:

It's suggested you change the name given to the attached database, so that it's "EnterpriseTesterTrial", like so:
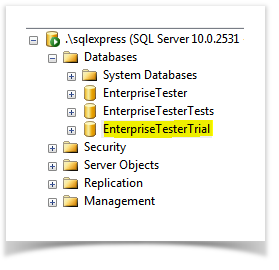
 Click OK to attach the database, it should now appear in the list of databases.
 Backing Up the Database
Now that the database is attached, we can back it up - this will then allow us to restore the database onto any sql server we like. Right click on the EnterpriseTesterTrial database, then select Tasks -> Backup...
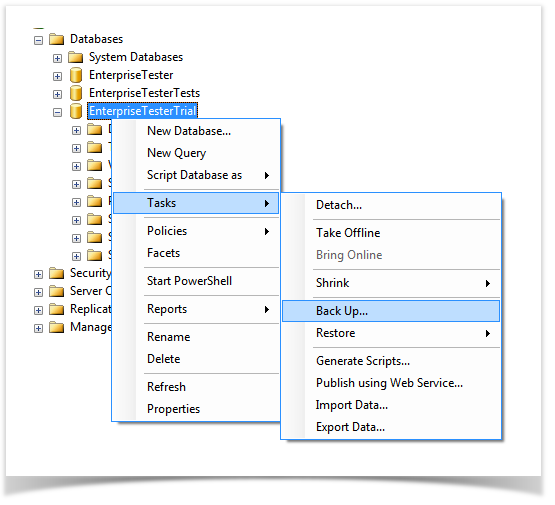
This will display the backup dialog, select a location for your backup file i.e. c:\temp\EnterpriseTesterTrial.bak and then click ok.
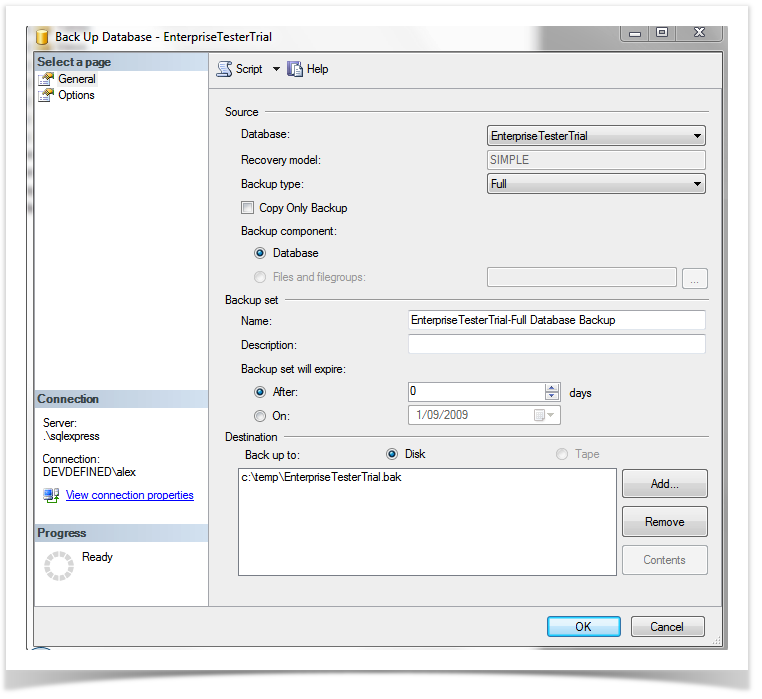
You will now have a backup of the Enterprise Tester trial database.
Restoring the database on another server
You can now restore the database on another server, such as the sql server your environment already uses for other applications. To do so you must:
First, create a new database, that will be the target for the restoration.
Restore the database.
To create a new database, right click on the "Databases" and select "New Database...".The new database dialog will display:
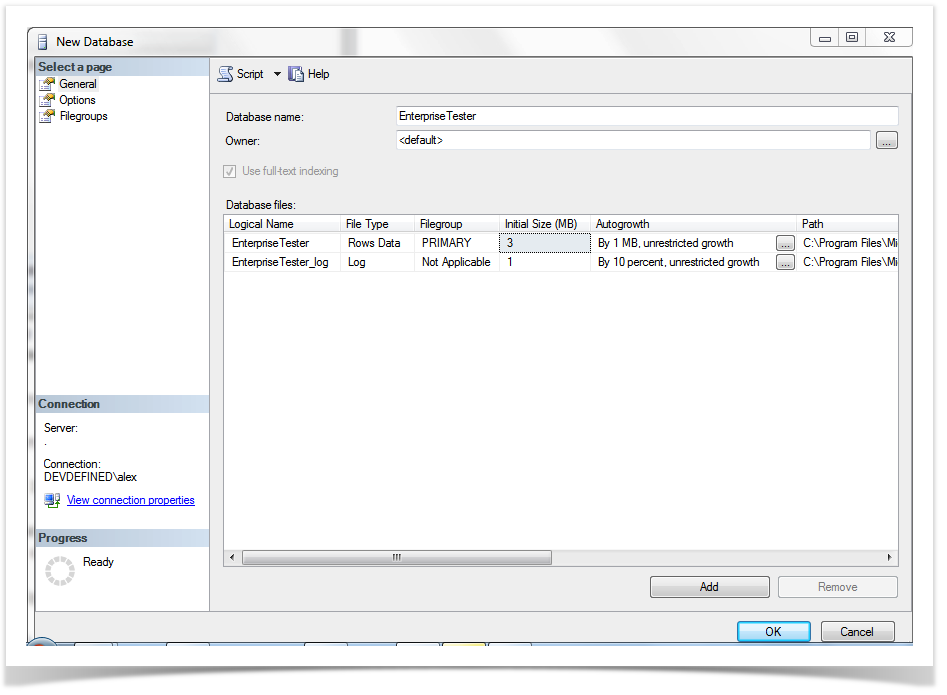
Enter a name for your database, such as "EnterpriseTester" and click OK. A new database will appear in the tree with the name "EnterpriseTester". Right click on this node, and select Tasks -> Restore Database..., the restore database dialog will appear.
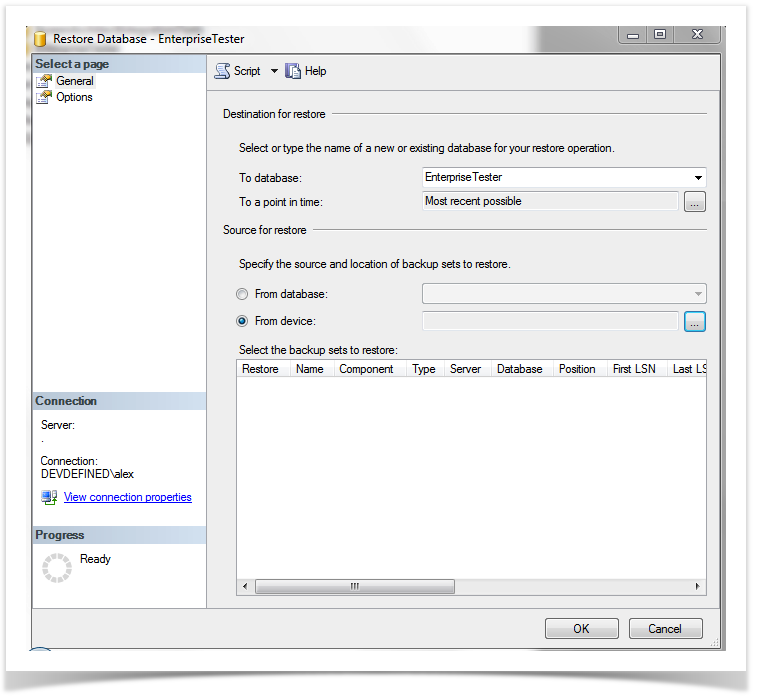
From here you must select the location of the backup you wish to restore, locate the file from the previous step i.e. c:\temp\EnterpriseTesterTrial.bak.
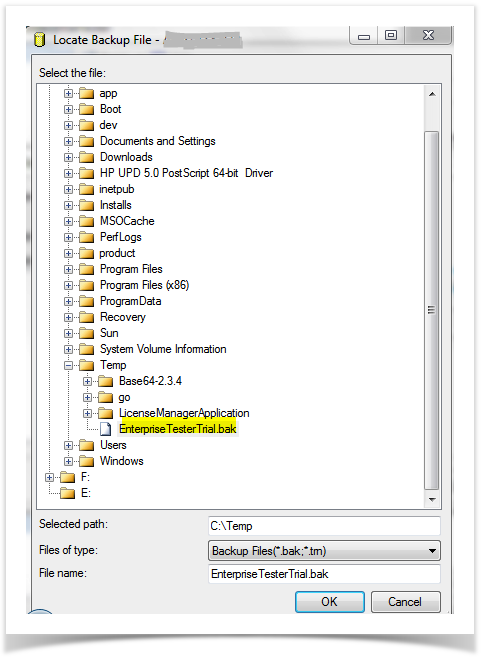
Once a backup file has been selected, you must then select which backup to restore - there should be only a single item, just click the checkbox next to it.

Once the backup has been selected, select the "Options" page.
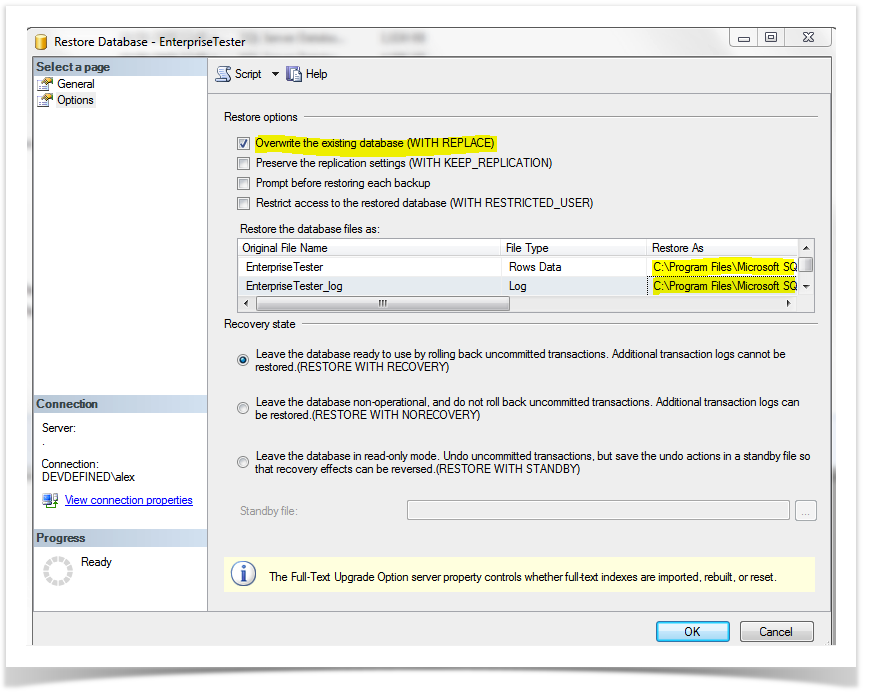
- Check "Overwrite the existing database (WITH REPLACE)".
- Edit the "Restore As" value for both the "EnterpriseTester" and "EnterpriseTester_log" database files.
- By default these will be pointing the old location of the database files from the attached database, you must browse and locate the existing database and log files that you created when adding the database.
- Click OK to restore the database.
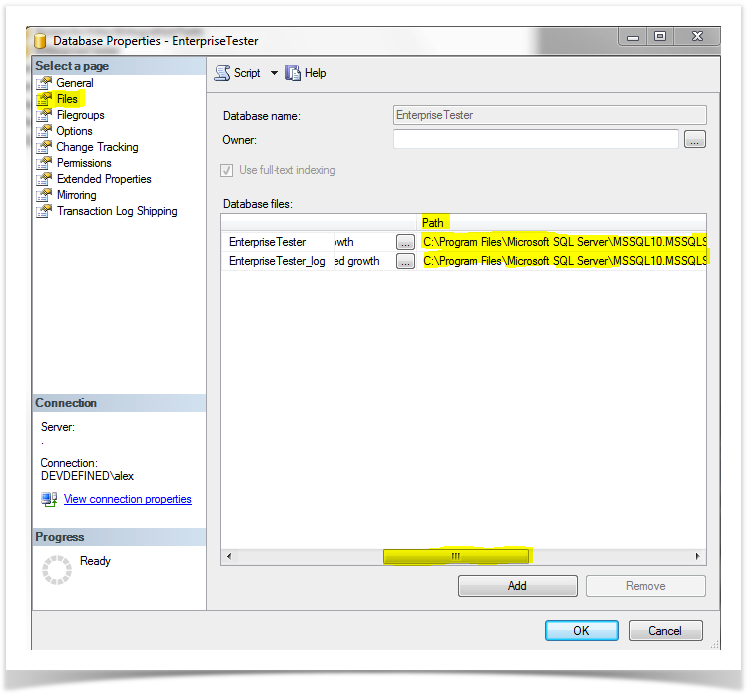
Finding the existing location of database files
The location of database files can vary greatly, you can determine the correct location by:
Right clicking on the "EnterpriseTester" database and selecting Properties.
When the properties dialog displays, select the "Files" page.
Under "Database Files" scroll the display to the right, until you can see the "Path" column. This will display the path for each database files, use these paths when restoring the database from the trial version backup.
Changing the connection string for the application
Now that the database has been moved you must change the connection string for the application.
In the installation directory of Enterprise Tester, locate the "web.config" file, which is stored in the "Web" subdirectory.
Open this file with a text editor, and locate the "<connectionStrings>" section, which should look like this:
<connectionStrings>
<add name="Default" connectionString="Data Source=.\SQLExpress;AttachDbFilename=C:
\Program Files\Catch Limited\Enterprise Tester\Data\EnterpriseTester.mdf;Initial
Catalog=EnterpriseTester;User
Instance=True;MultipleActiveResultSets=true;Trusted_Connection=Yes;"/>
</connectionStrings>
You must now replace the existing connection string,
i.e. Data Source=.\SQLExpress;AttachDbFilename=C:\Program Files\Catch Limited\Enterprise
Tester\Data\EnterpriseTester.mdf;Initial Catalog=EnterpriseTester;User
Instance=True;MultipleActiveResultSets=true;Trusted_Connection=Yes;
with the connection string for the new sql server database.
If, for example our server was called "SQLPROD1", this might mean we change the connection string to be:
<connectionStrings>
<add name="Default" connectionString="Data Source=SQLPROD1;Initial
Catalog=EnterpriseTester;MultipleActiveResultSets=true;Trusted_Connection=Yes;"/>
</connectionStrings>
For examples of valid Sql Server connection strings, please see the following website:
http://www.connectionstrings.com/sql-server-2008#p1
Once you have made your changes, click save, and then refresh Enterprise Tester in the browser to make sure it worked correctly.
Required Database Permissions
The user that accesses the database must have permissions to add, remove and alter tables and foreign keys. This is required by the automatic migration support in Enterprise Tester, which handles upgrading the database schema automatically.
Because this access is only required during upgrades, it is possible for a Database Administrator to enable it during an upgrade, and once Enterprise Tester has successfully started, to remove the permissions from the user (or to change which user accesses the database).