User Attached Instance Migration after Data Recovery
This guide is intended to provide directions on how to migrate away from a User Attached instance to a standard database instance after data recovery has been performed. For details on what a user instance, see this MSDN article: http://msdn.microsoft.com/en-us/library/ms254504.aspx
Preparation
To proceed with migrating away from a user instance you will need to:
Have a backup of your database, that backup file should end with the file extension .bak, if you have a zip file of the database backup provided from Catch limited, you will need to unzip the contents to the sql server's hard drive first.
Have Sql Server Express Management Studio installed - this can be downloaded from the following location:
http://www.microsoft.com/downloads/details.aspx?familyid=C243A5AE-4BD1-4E3D-94B8-5A0F62BF7796&displaylang=en
Last of all, before commencing installation please reboot the machine, and stop the IIS service (Start -> Control Panel -> Administrative Tools -> Internet Information Services -> local computer (right click) -> Restart IIS -> Stop Internet Services). This should prevent users from accessing Enterprise Tester, causing the existing database to attempt attachment.
Restoring the Database
Launch the Sql Server Management Studio via:
Start -> Microsoft Sql Server 2005 -> SQL Server Management Studio Express
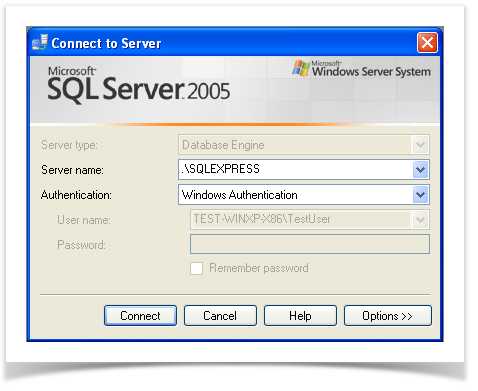
Once loaded, connect to your local SQL Express instance (this should just be matter of clicking the connect button). If the Server Name textbox is blank then enter the text ".\SqlExpress" before clicking the "Connect" button.
Once connected expand the right hand tree node, then right click on the "Databases" node and select "New Database...".
Enter "EnterpriseTester" as the database name, and click OK.
Expand the "Databases" node, you will now see a child database node underneath "EnterpriseTester".
Right click on the "EnterpriseTester" node, select Tasks -> Restore -> Database.
On the Restore Database dialog, select the "From device" radio button.
Click the Elipsis button "..." to the right of the "From Device:" radio button.
Click the "Add" button.
Browse to the location where you saved the database backup file ending with the extension .bak, and select it.
Click "OK".
Click the Restore "checkbox" next to the first entry in the "Select the backup sets to restore" list.
Click the "options" link on the left hand side, to view the options page.
Click the checkbox next to "Overwrite the existing database".
You will see two entries "EnterpriseTester" and "EnterpriseTester_log" with the following "Restore As" paths.
Double click on "Restore As" and change the paths from:
C:\db\new\EnterpriseTester.mdf
C:\db\new\EnterpriseTester_log.LDF
TO:
C:\Program Files\Microsoft SQL Server\MSSQL.1\MSSQL\Data\EnterpriseTester.mdf
C:\Program Files\Microsoft SQL Server\MSSQL.1\MSSQL\Data\EnterpriseTester_log.LDF
Alternatively you can browse for these paths by clicking the Elipsis "..." button next to each path.
Click the "OK" button to proceed with restoring the backup.
Once completed you should see the message "The restore of database 'EnterpriseTester' completed successfully'.
Changing the Enterprise Tester Connection String
Open windows explorer.
Navigate to the Enterprise Tester installation directory (normally c:\Program Files\Catch Limited\Enterprise Tester)
Navigate to the subdirectory "Web".
Open the file called "web.config" with a text editor, such as windows notepad.
Locate the default connection string, which should look similar to this:
<connectionStrings>
<add name="Default" connectionString="Data
Source=.\SQLExpress;AttachDbFilename=C:\Program Files (x86)\Catch Limited\Test
Management System\Data\EnterpriseTester.mdf;Initial
Catalog=EnterpriseTester;Trusted_Connection=Yes;" />
And then replace the connection string with the following:
<connectionStrings>
<add name="Default" connectionString="Data Source=.\SQLExpress;Initial
Catalog=EnterpriseTester;MultipleActiveResultSets=true;Trusted_Connection=Yes;" />
Test It
Restart the IIS service (Start -> Control Panel -> Administrative Tools -> Internet Information Services -> local computer (right click) -> Restart IIS).
Access the Enterprise Tester website, you should be presented with a login screen.
If instead an error is displayed the contact customer support and supply them with the following
information:
The log.txt file (found c:\Program Files\Catch Limited\Enterprise Tester\Web\App_data).
A screen shot or copy of the error message displayed when accessing the website.
Version of Enterprise Tester.
Operating System, Version & Service Pack details.
Performing Backups
Now that you have migrated away from a user instance, you should no longer user file copy to backup your database. Instead backups should be performed via Sql Management Studio.
This guide on MSDN provides details on how to do so:
http://msdn.microsoft.com/en-us/library/ms187510.aspx
Backups of databases can be automated as well with some simple scripting, more details can be
found here:
Backup Support
Please note that backing up databases, and automation of backups is outside the scope of the support Catch Limited provides to Enterprise Tester customers - additional support needs to be handled by your in-house database administrators and database vendors.
