This guide details to steps to install ET using a zip file.
The binary release allows you to do an installation by using a “zip” file rather than using the executable installation files (.exe).
Installing Enterprise Tester from the binary release files is recommended for use by purchased users or those trial users who wish to deploy Enterprise Tester into an environment where they cannot configure the IIS Default Website to use the values required by the installer temporarily.
If you are trialing Enterprise Tester, we strongly advise using our MSI based installer or which allows you to easily install Enterprise Tester and its prerequisite components.
Installing Enterprise Tester from the binary zip release involves:
- Ensuring any prerequisite components are installed.
- Unpacking the binary zip file into a directory.
- Configuring the web.config file which the correct database settings.
- Configuring where attachments will be stored.
- Creating an application pool in IIS for Enterprise Tester.
- Creating a new application for Enterprise Tester.
- Accessing Enterprise Tester for the first time, so that ET can automatically run the required database migrations to prepare the database for first use.
Advantages of Performing A Zip File Installation
- During upgrades it's easier to revert to the previous version just by backing up/restoring the application directory.
- You can have more than one version of Enterprise Tester installed concurrently (every Enterprise Tester license allows for 1 production installation and 1 development/staging instance of Enterprise Tester to be installed).
- The upgrade or downgrade process does not require any IIS settings to be changed.
Where can I get the Zip File from?
You can download the binary installation files from EnterpriseTester-4.11.1822-Bin.
What's in the Zip File?
When you unpack the zip file you will find this structure:
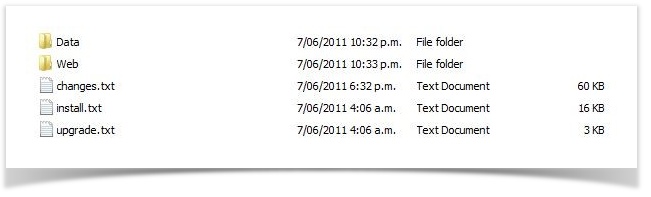
The Data and Web folders are the same as those installed into the "Enterprise Tester" directory, when using the existing Windows Installer (.MSI file).
Additionally there are 3 text files available:
- changes.txt
This is the release notes file.
- install.txt
This contains instructions on how to install Enterprise Tester using the zip release.
- upgrade.txt
This contains instructions on how to upgrade an existing Enterprise Tester installation (installed from a previous binary build) with the latest version one.
Note
Each time an upgrade is performed users must check the Upgrade text file and follow specific instructions relating to the release.
Install prerequisites
Prior to installing please ensure you have the following installed:
- .Net Framework 4.5 installed
- IIS Installed (via Windows Add/remove components) including ASP.Net support (http://msdn.microsoft.com/en-us/library/ms178477.aspx)
- A supported database (Sql Server, Oracle, PostgreSQL, MySql)
If you do not have a database, we recommend installing Sql Server Express 2012 r2 (http://www.microsoft.com/express/Database/)
Unzip the install files
Prior to installing Enterprise Tester you must unpack the zip file into a suitable directory.
If you do not have a suitable tool installed for unzip files we suggest downloading 7-zip, which is a powerful (and free) zip/unzip tool for windows operating systems. http://www.7-zip.org/
Once you have a suitable unzip tool, unpack the binary release file to a suitable directory - if you are unsure, popular locations include:
c:\inetpub\wwwroot\Enterprise Tester\
c:\EnterpriseTester\App\
c:\Program Files (x86)\Catch Limited\Enterprise Tester\
When the files have been unpacked you will find that you have a structure like this:
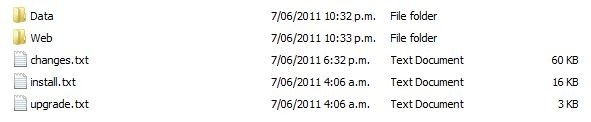 Data Folder – MySql Express database is found here
Web Folder – Application files are in this folder
changes.txt - readme file summarizing changes in each version of Enterprise Tester
install.txt – the document you are reading now
Configure the web.config database details
Follow the directions in the Configure web.config topic to setup your database connection information
Configuring an application pool
Before configuring an application pool for Enterprise Tester to use, you should give some thought to the application pools identity.
By default in IIS7/7.5 application pools are configured with the identity "ApplicationPoolIdentity" by default, but can also default to "Local System", "Local Service" or "Network Service". This is not recommended for a production system.
For production instances of ET, we strongly recommend the use of a domain service account as the identity of the ET application pool, combined with the use of integrated authentication for connecting to the database ET will use for storing its data.
There are a number of reasons for configuring the identity this way, including:
1. The ability to specifically grant ET access to network resources (file system etc.);
2. Domain service accounts can have their password cycle, offering more security;
3. Integrated security to the database will ensure that you don't need to put your password as clear text for the database in a connection string, and makes it easier to manage password policy etc. between SQL server and the ET server; and
4. Integrated access to resources such as Active Directory/LDAP servers.
IIS7/7.5:
- Go to Control Panel -> Administrative Tools
- Launch IIS Administrator
- Expand the server node.
- Click on "Application Pools"
- Click on "Add Application Pool..." under Actions.
- Give the new application pool a descriptive name such as "Enterprise Tester".
- Select ".Net Framework v4.0.30319" from the .Net Framework version list.
- Select "Integrated" for the managed pipeline mode.
- Click OK to create the new application pool.
- Right click on the new application pool and select "Advanced Settings.."
- Under the "Process Model" section, change the Identity to your service account (if you have decided to use one).
(Optional) - If you are using a 64bit operating system, and plan on using Enterprise Architect integration with .EAP files, you will need to change the option "Enable 32-Bit Applications" to true. Note: This will not be possible if you are using the Oracle 64bit ODP.Net drivers.
At this point you may find it useful to configure the timeout/recycling settings for the application pool, a common complaint from customers is that the timeouts are too short by default in IIS, so changing these to longer values is advisable.
Creating a new application for IIS
Next you will need to create a new application in IIS for Enterprise Tester.
IIS7:
- Within IIS Manager, expand the "Sites" node.
- Expand the "Default Web Site" node.
- Right click and select "Add Application".
- Enter an alias for the site we suggest "EnterpriseTester"
- Click the "Select..." button next to the application pool, and select the application pool you created in the previous step.
- Click the elipsis "..." next to the Physical Path, and browser to the "Web" folder of your Enterprise Tester install.
- Click "OK" to create the new application.
You are now ready to launch Enterprise Tester for the first time.
Launching Enterprise Tester for the first time
From a browser on the same server as Enterprise Tester, access the website - by default this will probably be: http://localhost/EnterpriseTester/
Or use whichever URL is appropriate for the Default Web site settings that are in place.
You will experience a delay (normally between 1 and 2 minutes) while Enterprise Tester creates the necessary tables and populates them in the target database, after which you will see a "Step 1 of 3" wizard page displayed, prompting you to create a new organization.
Refer to the topic Initial Configuration for more detail.