Managing Requirements
Test planning typically starts with understanding the requirements for the application. Capturing your requirements in Enterprise Tester allows you to take advantage of the requirement coverage reporting functionality once your test scripts have been created. Requirements are stored under the requirements folder in the project in Enterprise Tester. Requirements can also be imported from external systems such as EA or JIRA.
Adding Requirements Packages
In order to allow you to group the requirements in a meaningful way you can add packages to the requirements folder. To do this:
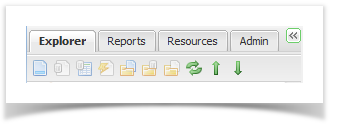
- Navigate to the requirements section of the project in the explorer view.
- Right click on the Requirements folder or a package within it and select Add Package. Or select the Add Requirements Package icon at the top of the tree view.
 The Add Requirements Package dialog will appear.
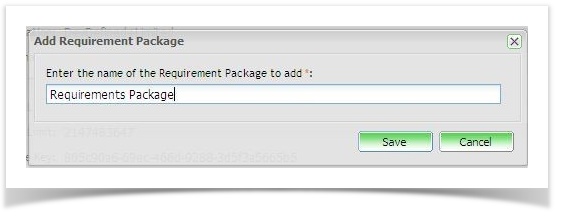
- Enter a name for the package and click on save.
The requirements package will be created under the selected project.
Moving Requirement Packages
You can move requirement packages if required. To do this:
- Expand the explorer view until you can see the requirement package.
- Select the requirements package and drag it to the required location by clicking and holding your mouse down.
The requirement package and everything within it will move to the selected location.
Adding Requirements
Requirements can be added to the packages that you have created by either creating them directly in Enterprise Tester, Imported existing requirements from a CSV or by importing them from Enterprise Architect.
To add a requirement directly in Enterprise Tester:
- Right click a package and select to add a requirement or select the add requirement icon at the top of the tree view.
- The Requirements Screen will appear.
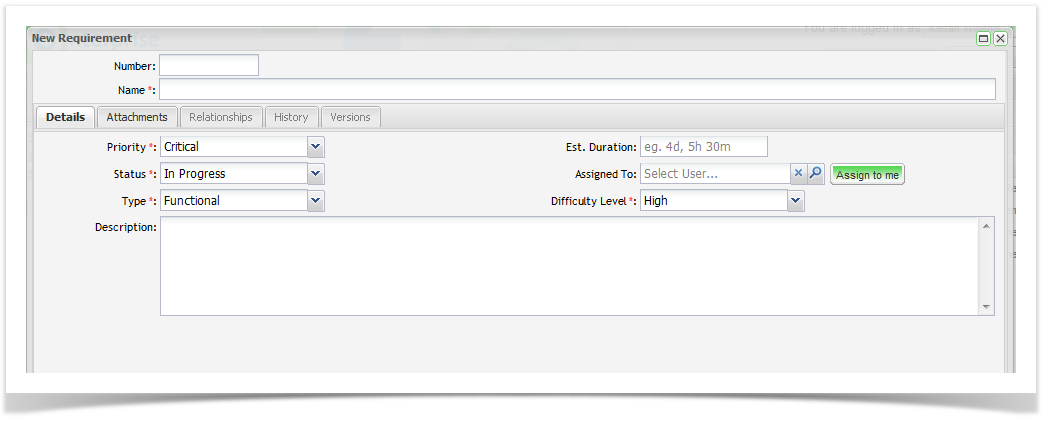
On the “Details” tab enter the requirements details:
Number
A number for the requirement
Note Auto numbering can be set as default.
Name
A short description of the requirement.
Type
Select from the pick list.
Priority
Select from the pick list.
Status
Select from the pick list.
Type
Select from the pick list.
Estimated Duration
Add a value such as 4d, 5h, 30m.
Assigned To
Select from list or click Assign to me.
Difficulty Level
Select from the pick list.
Description
A detailed description of the requirement.Click on ‘Save’.
- Click on ‘Save’.
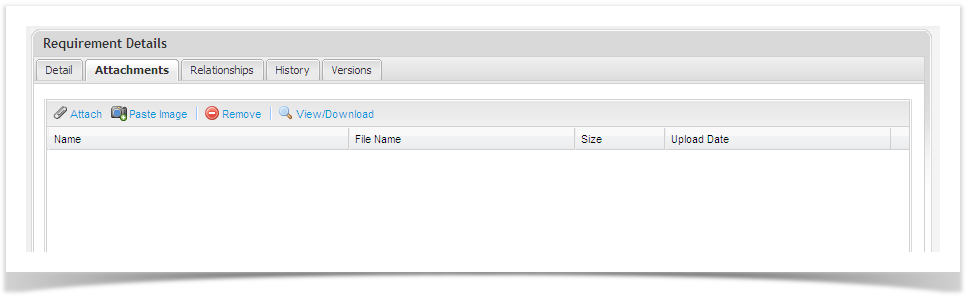
Adding Attachments to Requirements
You can add attachments to requirements by clicking on the Attachments tab.
- To add an attachment, click on the ‘Attach’ button, attach the file and save.
- To add a screen shot, click on the Paste Image button, paste the image and save.
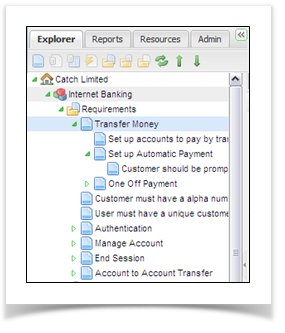
Nested Requirements
Enterprise Tester allows you to nest requirements, you can do this by right clicking the Requirement in the Explorer Tab and selecting Add Requirement. Alternatively you can drag and drop a requirement onto another requirement.
See the screen shot below where nested Grandparent, Parent and Child Requirements are displayed.
Viewing and Editing Requirements
Requirement Lists
You can view all requirements in a package by:
- Right clicking the Requirement Package in the Explorer Tab and selecting View Package
- Double click on the package in the Explorer Tab.
A list of all requirements in the package will be shown in the grid view.
The “Show Nested Items” tick box enables users to see all nested requirements in any sub-package of the selected Requirements package.
Filtering Requirements
Where a large number of requirements have been created within a single package, it is helpful to filter these records into more manageable groups.
To do this:
- Ensure your requirements are displayed in your grid view.
- Double click the Requirements package select view requirements.
- Click on the ‘Filter’ button to open the search screen.
- Select your search/ filter criteria and click on ‘Search’ to filter records and display results.
Additionally you can view requirements in the package you have selected and also any sub packages if required. Tick or un-tick the “Show Nested Items” box as required.
Viewing and Editing Requirements
There are several ways to open a requirement for editing:
- In the Explorer Tree, Double click on the Requirement, or Right Click on the Requirement and select View Requirement.
- Alternatively Double Click on the requirement in the Grid view.
Requirement Relationships
You can view and manage requirement Relationships from the Relationships tab.
Associated Requirements, Scripts, Script Runs, Automated Tests, Automated Test Runs and Incident relationships are displayed.
Adding Relationships
You can add relationships via this tab if you require.
To add a relationship, select the requirement you wish to associate and click the add button.
The Add Relationship pop up dialogue is displayed.
Select a Relationship Type:
- Association - Requirement to Requirement Relationship
- Dependency - Requirement to Requirement Relationship
- Coverage - Automated Test to Requirement Relationship
- Coverage - Test Script to Requirement Relationship
Select a Destination:
You will be able to select a Requirement, Automated Test Script or Test Script to link to depending on the Relationship Type you have chosen to create.
Select a Direction:
Requirement to Requirement relationships have the following available directions:
- None
- Source to Destination
- Destination to Source
- Source to Destination & Destination to Source
There is only one direction available for:
- Dependency - Requirement to Requirement Relationships
- Coverage - Automated Test to Requirement Relationships
- Coverage - Test Script to Requirement Relationships
This is:
- Source to Destination
Click OK and the relationship will be created and saved.
Removing Relationships
You can remove a relationship by selecting a Requirement, Automated Test Script or Test Script that is related to the Requirement you are viewing, and then by clicking the Remove button.
Note: You will not be prompted for a confirmation to remove this relationship.
Editing Relationships
You can edit a relationship direction by selecting a Requirement that is related to the Requirement you are viewing, and then clicking the Edit button.
Change the relationship direction in the pop up dialogue box and click ok to save it.
Viewing Requirements History
You can view the history of changes made to a requirement.
To do this:
- Select the History tab of the requirement when you have the requirement open for editing - the history of changes will be displayed.
You can filter the list of changes displayed by selecting from the filters available and clicking on ‘Search’, the filtered list will be displayed.
To clear the filter click on ‘Reset’.
Requirement Versions
Enterprise Tester also creates versions of requirements each time a set of changes are made.
The Versions tab lists the versions that have been created over time and provides the following information:
- Version - Sequential version numbers
- Created At - Timestamp at which the version was created
- Created By - The user that made the change
- Comment - Comments regarding the source of the version
This tab also displays detailed information for the selected version showing the difference between that version and the latest version. Details provided are:
- Property - The name of the property.
- Value (latest ver) - The current value of the property for the version.
- Value (selected ver) - The value of the property for the selected version.